The Covid-19 pandemic has led to major lifestyle changes. That could significantly impact the housing market in college towns, according to a new survey.
I made some custom artwork for my house by turning a tree stump into a stamp and imprinting the growth rings on a sheet of paper. Let me show you how I did it.
I first grabbed a tree from my property. This is mesquite. It had been cut with a chainsaw. And while not too rough, the surface wasn’t perfectly flat. So I used my Triton Belt Sander to work on getting it flat. However, while it was working, it was taking a bit too long.
So I decided to take down the bulk of the unevenness with my Triton Electric Planer instead. I originally used my small planer to hit the high spots. Then after getting the surface roughly down to the same level, I switched to using my larger Triton 7″ Planer.
Then, after a few passes with the belt sander again, I had a smooth surface that was nice and flat. It’s important to get a nice flat surface so that your paper can hit everywhere on the stump and transfer the ring pattern.
So now the stump is nice and smooth. But in order to make the print work, you need high and low spots. When looking at a tree ring there are portions that are soft wood and hard wood. The idea to make a stump into a stamp is to use heat to slightly burn away the soft wood so that the harder rings are pronounced.
I decided to upgrade to my propane bottle torch to speed up the process. I was aiming to get a nice and even burn without charing the surface.
Afterwards, I used a wire brush to remove the debris I created. If you can run your fingers over the surface and feel the distinct tree rings, then you’ve done enough.
Then I let the stump fully cool down because up next is applying ink and you dont want the stump to be hot when doing so.
I’d first use a spray bottle and wet down the surface of the stump. This will help the paint from soaking in and instead remain on the surface. I’m using acrylic ink and applied it using a foam roller.
After making sure the entire surface was coated, I lined up my paper and set it in place, being careful not to shift it side to side once it was down.
I would then carefully peel the paper up from the stump to reveal the outcome. Pretty neat!
I was having so much fun with the process that I decided to make some more, playing with the amount of ink I used. I found that if you used too much ink, the image came out smudged looking. And if you don’t apply too much, the image comes out faded and the paper sticks to the stump.
Once I had the process down, I started playing with color. I used water to rinse in between colors. Then I’d apply a new color and play.
Then, after the prints were fully dry, I placed them in a frame and hung them up. Now I have some custom artwork in my house that I absolutely love.
Be sure to watch the video for an even better tutorial. Hopefully you’ve enjoyed this one. I will see you on my next project!
If you haven’t already, don’t forget to sign up at the top of this page for my newsletter so you don’t miss new projects!
(Most of the links listed above are affiliate links. As an Amazon Associate I earn from qualifying purchases. Thank you for supporting me in this way.)
In this tutorial I’m going to show you how I made these floating live edge wood shelves. It’s a very simple process but can turn any wall space into something visually unique but also functional. Lets get into the process.
I’m starting off with a walnut slab that had a good amount of bug tracks on one end and a deep but beautiful bark inclusion on the other. I think features like these give the shelves character so I intentionally chose a board that wasn’t flawless.
However, since there are so many cavities I went ahead and starting the process by first filling them with clear epoxy. I flipped the board over to what will be the bottom of the shelves then started taping off any and all cracks or holes I saw.
After getting a good amount of coverage over any, I used a pencil to press the tape down firmly. Leaking epoxy is not fun, however you also see I laid down some cardboard on my workbench before getting starting.
Now for the end I went with something a little bit more thick than painters tape, I did four layers of duct tape to try and build up a dam on this side. I just need something to keep the epoxy from spilling over once I start pouring it in the voids.
Even after a few layers of tape though, I knew it wouldn’t hold so I next grabbed a thin scrap that had some flex to it and screwed it into the end. Making sure it took the curve of the slab. Then the last thing I did before pouring was clear out all the dust and dreby from the voids.
If you don’t want to go through all this work of pouring epoxy then know you can skip this step. With these being shelves, there wouldn’t have been anything wrong with leaving them as is. I just like the look that clear epoxy gives the surface.
Before pouring, I like to raise the slab off the workbench so I can check for leaks along the way. I grabbed a few bench cookies from my dispenser and set them on either end of my slab.
For epoxy I’m going with my go to brand of epoxy which is Total Boat. Here I’m using Total Boat High Performance. This stuff is crystal clear, is a simple 2:1 ratio, and dries pretty quick.
I poured this in the morning, let it sit overnight, then was ready to start sanding the next morning.
Be sure to read the mixing time and stick to it when using epoxy and also make sure to have a flame on hand so after you pour, you can use the heat to remove all the air bubbles. I typically keep a small torch in my shop for this reason but couldn’t find it and tried using a regular lighter. It makes the fingers a little toasty since it’s so close so I went with the only other heat option I had around which was my mega torch. : ) Ha, it’s overkill but a quick spritz and all the bubbles were gone.
Be sure to overfill any voids because in the next step you sand it, and you want the surface of the epoxy to come out flush with the surrounding wood after.
Also if you’re needing epoxy remember I have a 15% off coupon code on anything Total Boat if you use the code AprilW at checkout.
Ok after letting that sit up overnight it was sanding time. I wheeled my shop vac and separator cart into place, hooked up my Triton ROS and started the process. I always start with 60 grit sand paper to take down the bulk of dried epoxy. I also prefer to use my larger ROS since I have one but a belt sander would also take it down quickly.
After getting it flush, I switched over to my palm ROS and then ran through the grits, going over the entire slab at the same time.
As I ran through the grits, going from 60 to 100, to 150, to 220, to 320, to 400……I would really focus on hitting the epoxy portions to remove as many scratches as possible so that in the end it would be crystal clear in the ending results. I like to use a little mineral spirits to get a sense on how it will look with finish on it.
When I’m happy with the results, I move on! Hitting the entire edge with my sander, then wiping it all down to prep to applying finish. I’m testing out a new finish called walrus oil on this project and found it very simple. Of course it makes the walnut just absolutely pop as soon as it’s spread on. I always start off with finishing the bottom of projects first then flip them over to do the show face before letting the entire thing set up to dry.
BTW: even though these will be five separate shelves, it’s much easier to do all of these steps with the board as one big unit rather than working with five smaller pieces.
So after letting the finish dry, I then started marking out my shelves boundaries on the slab. I’m using a soapstone pencil and my track saw guide to draw out where I think the shelves should be so I can make sure I like the visual of them before actually making a cut. I wanted the shelves that will be most at visual level to be the ones with the most character in them, so the large bark inclusion and the bug tracks.
Once I was happy with the layout, I hopped up on my workbench and used my Triton track saw to start making some cuts.
The track saw is great to get straight cuts on a natural shape like this that doesn’t have a straight edge reference to start. However, I’m using almost every inch of this slab and couldn’t over cut my lines so I would sneak up to the corner with the saw as close as I could, then finish it off with a hand saw.
Once I broke down the slab a bit using that method, I was then able to take the remaining slab and pieces to the table saw and use my Rockler Cross cut sled to finish it off.
Oh yeah, that’s gonna be cool I think. I not only cut up the rest of the slab but I also used my sled to get all of the edges at a perfect 90 and the shelves to final length.
The Shelf Hardware I’m going with can be found at Rockler.
It comes with a rectangular mounting bracket that will butt up to the back of the shelf. I like to cut in a small recess on the shelf so the back will sit flush up again the wall when it’s mounted. After marking off the placement of the two brackets, I used a straight bit in my router table to carve this recess out. Test fitting the bracket afterwards to make sure it would comfortably fit.
With the bracket cavity cut in, now I just needed to drill the holes for the hardware. With it being a live edge and so tall, using a drill press isn’t an option so instead I’m using a new drilling guide from Rockler.
It’s pretty much a portable drill press and has quickly gone up the list of one of my favorite things. This quill here can be chucked up in a drill and travel up and down. There are two stops that can be placed anywhere in order to regulate the desired depth. It has onboard storage for a chuck key, and even a tilting feature so you can drill straight but at an angle. Tell me that isn’t cool.
There are also two pins that have on board storage at the top that can be screwed into the bottom. These can be set on the edge of any piece of wood to help you quickly find center of that edge.
I could have used this feature to drill my holes, but instead I used the mounting holes in the drilling guides deck to secure it horizontally to my armor tool workbench. I locked all four casters to keep it from moving around on me, and just felt like this was a bit more secure for the depth of hole I was going after.
I would line up the shelf so that the center of the mounting bracket recess was in line with the center of the drilling guide’s bit, then plunge. After drilling the depth needed for the first, I would move the shelf over and repeat on the second. After knocking out one shelf, I repeated on the remaining four.
Hanging the shelves is very easy. I started off by first measuring out the height I wanted each shelf then used a level to draw a straight line across.
Now the mounting bracket can be held up into place and the first screw sunk to secure it. After getting the first screw set, I used the level again to make sure it was level before driving in the second screw. Once the first bracket was attached, I used the level to make sure the second bracket went in the same.
The top two holes are for mounting the bracket, the third is for a set screw to be inserted so that a metal rod can be threaded on. This is what will go into the holes I drilled in the back of the shelves.
Rockler has two versions of this mounting hardware: this one that is rated at 50lbs (which is still a lot), or Heavy Duty Supports that can support up to 125lbs.
For my shelves, I went with a staggered look. I don’t know what I’ll end up storing here in the end but no matter what it is, the shelves definitely took this bare space and turned it into something more interesting and beautiful. All from a slab I grabbed from The Wood Shed as well.
I was about to call this project done when I decided to add in a hidden feature….just for you loyal viewers. I quickly grabbed a few more scraps and threw together a simple and tiny drawer to mount on the bottom side of the lower most shelf.
In this drawer, I will always keep a few stickers and if you ever come to The Wood Shed in person, please feel free to help yourself to this secret stash.
Ok, and that really does wrap up this project. Big thank you to Rockler for sponsoring this video and supporting what I do.
I hope you’ve enjoyed this Live Edge Floating Shelf project. Be sure and watch the video for an even better tutorial! And I’ll see you on whatever I’m working on next.
If you haven’t already, don’t forget to sign up at the top of this page for my newsletter so you don’t miss new projects!
(Most of the links listed above are affiliate links. As an Amazon Associate I earn from qualifying purchases. Thank you for supporting me in this way.)
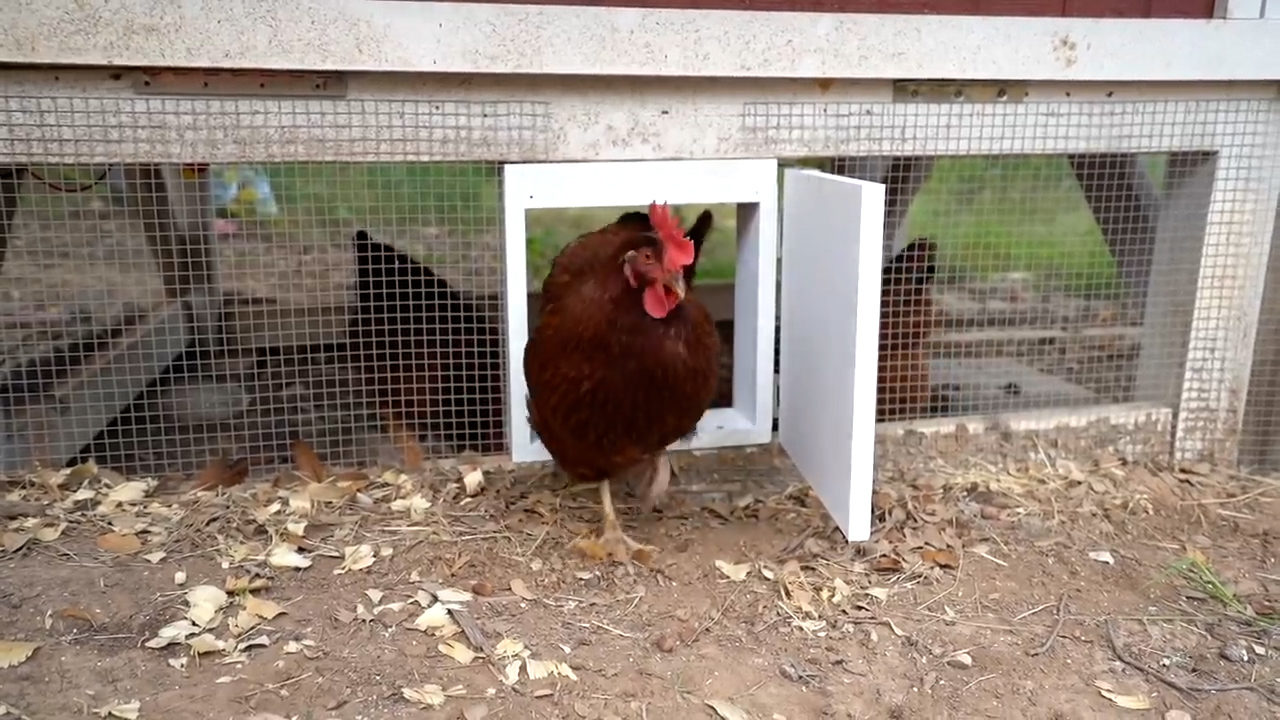
I built this chicken coop last summer and have been loving my chickens but I don’t like having to come out first thing every morning and every evening to coop and uncoop them. If you don’t know, chickens will go inside their chicken coop every evening on their own around dusk. But I still have to be here or come out here to shut the door and keep them safe.
So this week I finally tackled building my own automatic chicken coop door. It’s on a photocell so when this device here senses light, it will open the door and let the girls range.
Then when it no longer senses light, it will shut. I was worried about cloudy days but so far there hasn’t been any issues with it!
If you’re interested, I have a set of plans available that has a full material list. You can find the plans for this door HERE and also the plans for my coop HERE (or at the bottom of this page).
Ok, I started by making the door. For this I’m using scraps from my shop and just gave them a few good coats of paint.
All of the components for this build will be hidden under the chicken coop itself then also under the nesting box so I’m not overly worried about using untreated wood.
The door itself is very simple, it starts as just a simple box. Next a door is added with two hinges.
The linear actuator is one of the main components that makes this whole thing work. You can go cheap on these guys but if you’re shooting for quality and something that will last then I recommend going with this brand called Progressive Automations. They have a huge variety of not only linear actuators but also other electronic items. Also, it’s worth noting that they have great customer service that are happy to help pick out the item needed for a certain job in mind.
I added in a few more painted scraps to the top, to create a cubby for the actuator to go in.
The actuator will extend out and contract in, which is what controls what opens and closes the door. To attach the two components, I used an L bracket.
I screwed it to the top of the door first then positioned the actuator.
For attaching it correct, the actuator needs to be fully extended. I’m using a transformer temporally to give it power. This is such low voltage that you don’t have to worry about getting shocked. If you hear clicking but no action then reverse the connections and you should see it work.
Perfect, with that done, I clamped the door firmly shut as that’s the position I want to establish when the actuator is fully extended. Once slight pressure is applied to the bracket, the back of the actuator can be screwed down and secured.
Lets test it out and make sure it’s working as it should.
Ok so when installed on the chicken coop I’ll be using a solar panel and battery to power the operations, but first I wanted to wire everything together on my workbench to make sure it worked before going through the actual install.
With that, I added in a relay which is the switch to extend and contract the linear actuator. Then also a photocell which is the component that will sense light and trigger the switch from open to close or visa versa.
With the concept proven and the how to figured out, next it was to install it on the chicken coop. I’m placing all of my important pieces under the chicken coop to keep it out of the rain, which includes the linear actuator, the battery and the relay.
Oh, I also added in a fuse between the battery and the actuator….to add in the door, I cut into my chicken coop wire, added in two studs then slipped the door right into place.
For the photocell to work, it’s placed higher up on the coop and facing West to catch the evening light.
The chickens start going home around night fall and the door stays open until a little bit past that.
If relying on the sun makes you uncomfortable then another option would be to have a timer placed in the system. I didn’t go this direction because I didn’t want to change the settings when the time changes.
I really hope you enjoyed watching this project come together and if you have a coop then I hope you’re inspired to make your own automatic door.
Be sure and watch the video above for an even better tutorial.