
from Home Improvement – Today's Homeowner https://ift.tt/2Etm66a


Well, as the title points out, the future really has arrived in the form of this gnarly set of battery operated bolt cutters from Ryobi. The most shocking part of the entire story: The Home Depot will trade you one hundred American dollars for one of these tools….and it works like a champ : ) I wasn’t a true believer when I saw this tool coming up for review but now that I’ve gotten to beat on it a little bit I can tell you I’m totally on board with reaching for this set of cutters the next time I need to cut through a piece of chain, bolt, pad lock, or any other round material I can stuff in it’s jaws. Here’s what I learned about it:

At 16-1/2” inches long and about 7 lbs in weight, it’s no small tool and feels a bit like a mini-ordinance launcher in your hand. At that point it’s not hard to keep a hold of with the ultra grippy texturized rubber that’s overmolded throughout the entire body of the tool. Ryobi simplified the trigger mechanism by giving you two directional buttons for opening and closing the jaws keeping you in positive control of the closing action.

Speaking of, lets take a closer look at these jaws on this cordless bolt cutter. The jaws are made from forged steel which undergo a custom heat treating process to increase the surface hardness of the blade material. Ryobi doesn’t share with us the exact hardness of the jaws but it’s safe to estimate them somewhere around the high 40’s on the Rockwell C scale.

Ryobi recommends not cutting anything above 3/8 of an inch but you may get away with cutting soft 1/2” if you’re patient with the cut. If you’re cutting 3/8 stock, Ryobi recommends sticking with a softer grade alloy and steering clear of hard material such as a grade 8. However, it will handle 1/4” hard materials just fine.
So how’s it cut??….actually, it cuts pretty darn well. I cut a variety of materials to get an idea of the cutting power of these little jaws. Take a look at the materials down below:

So you probably get the idea here. If you plan to employ this tool for some medium to light duty metal cutting on something like metal shelving, bolt tails, light duty chain and so on, chances are it will perform perfectly for your needs. Occasional pad lock cutting for someone who owns a storage building facility would fit pretty well in the operational range of these electric cutters but you may be getting close to it’s limits. Finally, if you’re interested in cutting something like rebar in a production or job site capacity, you may need to look into something with a few more buck-wheats as the motor will not be able to push through it….something tells me a big brother option is on the horizon however…

Two more things worth pointing out are the replaceable jaws and the work horse of a battery that powers this rig. Working this tool as a replacement bolt cutter for your company or business is probably gonna require replacing the jaws at some point along the journey. Ryobi has you covered here with replacement jaws available through Ryobi. Simply remove the stockers by backing out the two 1/4” bolts which hold the jaws in place, slide in a new set, and you’re back in the race. Following all of the material I cut up to this point, the only physical damage I can see is superficial in the paint and shows little to no real deformation at all.

On the other hand this 6.0 Ah battery is one you can push until you’re little hearts content and may very well outlive you and I both. This battery is optimized for the entire line of Ryobi ONE+ products and features a built in fuel gage so you’re always one button away from understanding the current charge level. With the 6.0 Ah battery installed, Ryobi reports a working potential of over 200 cuts per charge with this particular tool.

Thanks for stopping by to learn a bit more about this fun new tool from Ryobi; I really appreciate it. This review was provided in support of the ProSpective Campaign sponsored by The Home Depot. They supply the tool and I supply an opinion. The links in this review are affiliate links and provide a small kick-back to the website which helps to keep the wheel turning. Regardless, I genuinely appreciate your support.
The post The Future Has Arrived: Battery Powered Bolt Cutters From Ryobi! appeared first on Wilker Do's.


First came the AC and now comes the DC! This is another absolute must in the woodworking shop, this week I’m installing a dust collection system. I am very fortunate to have partner with ClearVue Cyclones for this installment.

ClearVue is a family owned business that is made right here in the US. They just released a brand new metal unit called Pentz EF5. I was excited about this because I wanted to store my unit outside of the shop, under my covered patio, to cut down on the noise inside the shop when it’s running and to also save on the footprint the unit creates inside.
The plan is to have one long main truck running across the north wall of my shop so I can have drop downs to all my larger machines that will require DC. Of course right now I don’t have that many, but I will certainly be adding to my collection in the future.
Now even though I’m housing the unit outside, I’ll be keeping the filter inside so I will have a way to recirculate my heat or cooled air. If the filter were outside then I would be disposing of the air. I’ll get into more details on this later.

To start the process off, we started on constructing the main truck on the floor. I’m going with an 8” main truck line then the down shoots will taper into a 6” line. I worked with ClearVue before hand to figure out where along this back wall my tools will be placed, both my current machines and my future machines such as a jointer. This allowed them to put together a diagram we could work off of and made this part of the process go very quickly.


Of course everything can be moved around in the future should I need to move things around or add additional machines but the main components are the Ys that will create a down shoot from the main truck, blast gates to shut off different sections of the run, and elbows to soften the turns to keep a smooth track for the air to flow along.

For the duct work, you can go with PVC which is what my good friend Jay Bates did and he published a great video covering his install which you can find here. I went with Norfab ducting for mine. It’s more expensive but it’s a reusable system that is not only very quick to install but it’s also extremely customizable. Instead of using adhesives or rivets, the components use a clamping system to join parts together. So we started off by laying out a dry run of an entire branch, once things looked good, we could very quickly start joining things by mating up the two ends inside a circular clamp. All in all I think it took two hours to put all the ducting together and the best part is, if I ever want to change up something in the future all I have to do is unclamp the section I want to modify and change out the component.
With that done, we moved outside to set the motor in place because the placement of this will dictate the position of the main truck line inside. We placed it as high possible because I wanted that main line to be up and out of that highly useable zone on my shop walls.

The unit I’m going with is a 5 horse power cyclone designed by the one and only Bill Pentz. If you aren’t familiar with the name, Mr. Pentz is widely recognized as the leading figure in dust collection technology and he solely works with ClearVue. The EF 5 is a 5 horse power unit with an 16” turbine.


Once the motor is mounted to the cyclone, it is pretty darn heavy. Two people can lift it, but since I went so high with the mounting position we had to bring in the tractor to assist in getting it up to it’s bracket.


While we get that installed let me circle back to having this unit outside. The big pros are the reduction in noise in the shop, and also the lack of an additional footprint. The disadvantage is if you have a heated or cooled space then this giant vacuum will be pulling out that controlled air and disposing of it outside. Which will make keeping your space heated/cooled not only harder, but also more expensive.
The workaround to this is to have the motor outside but have the filter inside so that after the air goes through the cyclone and deposits all the large shavings and chips into the collection barrel, you have the option to route it through the filter and back into the shop. Keeping all that heated or cooled air in the space.
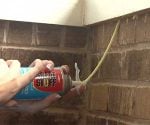
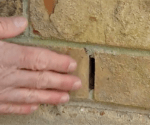
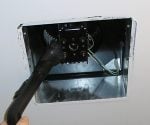
And that’s what we started working on next. Drilling and cutting two holes in my brand new shop wall to route both the intake and exhaust lines.

Incase you’re wondering, yes, it was nerve wracking.
I used a bit long enough to punch through to the outside from the inside. Then I came back with a jigsaw to cut the hole exactly to size.


The top hole will be the intake. So when the DC is turned on, it will pull air and collect sawdust as I’m making it at my machines. It will then come in through the intake of the cyclone where all the heavier particles will drop down into the 55 gallon barrel. Which is hooked up to the bottom of the cyclone. Then the air will be routed to the bottom hole of the shop which leads to the filter inside. This filter goes down to a .5 micron and it’s job is to collect all the fine dust particles that the eye can’t see, before spitting the air back out into the shop.


The guys also included a Y on the exhaust port here to give me the option to vent the fine dust directly outdoors. This way if I’m not running my AC I can switch around the blast gates quickly and vent right outside instead of bringing it back in. And since I’ve been using it for a while now, I can tell you that it works so efficiently that even when I’m venting outside, I don’t see any dust coming out.

Ok lets move back inside and get the ducting hooked up. This goes together very very quickly at this point. Each section is lifted up and it’s best to have three people on this job. One person to clamp it to the previous section, one for stepping the section to the wall with plumbers tape, and one supporting the branch with something like a broom.

And man does it change the look of the shop once it starts going up. I had thought to paint it before installing it but I’m so glad I didn’t, I love the industrial look it gives the space.
The main things to keep in mind when installing these sections is to make sure your blast gates and Y components are facing the correct way. Of course you also want to use a level so it comes out looking sharp in the end. We went through beforehand and made marks so we could quickly throw it up without stopping.
Same thing when clamping on the down shoots, use a level to get them straight and plumb. This particular down shoot is for my future planer and jointer. Since they won’t be in use for some time, we placed an end cap on both.

On the runs that go to a machine with a 4” port instead of 6”, such as this one that goes to my bandsaw, a reducer fitting is put into the line to taper the size down so that a flex hose could be connected with a hose clamp. I did the same exact thing on the line to my bench top thickness planer. Also on this tool, since I’ll want to have the ability to pull it out from the wall to run longer stock through, I made sure to leave myself a good amount of flex hose.


The last run to make was the line to my table saw, which required the trunk to be suspended in the air so that it would stay inline with the main trunk against the wall. I found two trusses to throw in a few hooks, then use some paracord to capture the line and hold it in place.

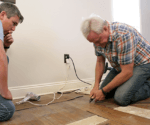
While I was working with Paul on getting the line up for the tablesaw, Cody was awesome enough to be working with James on handling the electrical for the collector. When I built the shop I planned for this installment and left a dedicated 220 circuit for the motor over in the north east corner. This 220 will be used to run the motor but since I wanted to run the unit with a remote, they also had to tie into a 120 line for that relay.

So Cody removed the wall panel to run the wiring needed, shimmied it back into position, then connected and install the control box. Yet another hole was drilled through this wall to get the power cord to the exterior unit, although this one was muuuuuch smaller.

And for right now, I think that completes my system. Ahhhh isn’t that so cool looking. Cody flipped the breaker, ClearVue gave me the remote and I tested her out. The first thing I did was see how much dust it sucked up off my hands. It worked quiet well.

Next I opened the blast gate leading to the table saw and watch the flex hose as it removes all the sawdust that’s inside my cabinet! Incredible.

I might look into automative blast gates in the future but right now I’m using a longer bar clamp to open and close the second half of my main line depending on if I’m using the bandsaw or tablesaw.

Overall it took, not even a full two days to install everything I’ve shown you. So if you are committed to this hobby, then I recommend making dust collection a priority and protecting those lungs. Big thank you to ClearVue for coming down and supporting what I do. The guys there were cool enough to give me a 5% off coupon code to pass along to you guys. If you use the code Wilker Dos at check out you get 5% off anything you purchase at clearvuecyclones.com
Be sure and check out the video above for more of this install.
Thanks for coming along on this one, I hope you enjoyed it. I’ll see you soon.

The post Installing A Dust Collection System appeared first on Wilker Do's.


Things I Used In This Project:
In this video I’m going to be tackling a bunch of small tasks that focus on organizing my shop.
Just coming off building it and moving things in, everything is out of place and more than that, nothing has a place. It’s not only frustrating because I can’t locate anything, but also intimidating because so much needs to be done. Of course, it’s one of those things that needs to be done a little bit at a time so this week’s to-do list is a bunch of small things that are not challenging or even time consuming, more a matter of just taking the time do them.
The goal is to not necessarily set things up the way they will be permanently but more so to get things off the floor, out of boxes, and off all my horizontal flat work surfaces.
I started off with pegboard as it’s a dead easy solution to get a lot of things put up quickly. You can purchase 4×8 sheets right off the shelf and throw them up, however I took the time to paint mine just to give it some color.

To make a simple boarder, I grabbed some 2×4 material and ripped it down at the tablesaw. This was the night before I had finally got power hooked up to my shop, so I was still having to work with my job site saw on the porch.

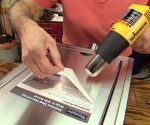
After ripping the boards down, I also cut in a rabbet at the table saw so the pegboard would have a recess to fall into on the back of the frame. I gave the frame a quick coat of paint then while that dried I took the time to make a stencil from my logo to transfer onto the pegboard.

To make a stencil I print off the design I’m after and cover the entire page in clear packing tape to give it some rigidity. Then I used an exacto knife to cut it out. I suppose I could have kept the negative side of the stencil instead of this positive side, but regardless……I could now place the stencil where I wanted it on my board and trace it out to paint.


I grabbed some help to move the pegboard inside to the frame then set it inside so that it rested inside the boarder I made. I attach it to the boarder, I used a fast drying CA glue from Titebond called Instant Bond. I switched over to Titebond Original when gluing on the support strips along the back, but then called the board done and ready to be hung.

Now you don’t have to take it from me, but I recommend grabbing another person to help hang the board. It isn’t that it’s heavy, it’s just awkward to hold.


If you ever come to my shop and notice how busted up my pegboard frame is, you’ll know why. But meh, it gives it a story ; )
I admitted defeat and called in help to lift and hold it in place while I secured it to the studs.

While working on pegboard, I also hung my old board from my previous shop. When I was moving out, I didn’t have the heart to leave it behind or throw it away. And even though I’ve change my logo, I again love the story behind it and am glad I held onto it.

Having these two boards up, made a huge difference in helping me clear off my flat surfaces. It gives me a dedicated spot for my safety glasses, my chisels, my glue brushes, my tape measures, my hammers….all the tools I use a very regular basis.

For all my extension cords I threw a hook into the wall. I started them off high but then I decided to add some French cleats to this nook to store some extra hardware bins I had in a box, so I moved them down.

Again on the hardware storage, I have a master scheme that I can’t wait to tackle for all my hardware, but it will take me time to design and execute. So in the meantime I will use this temporary solution so I can get rid of the box they were in and also have my remaining hardware on display for my use. I do have a video on making these bins in three different sizes and also a free template if you’re interested in making your own. They are a little time consuming but a great use of scraps and they last forever if you put in the effort once.


It was at this point the shop’s power was actually flipped on and I got to use my cabinet grade saw for the first time in the new shop. Needless to say I was happy.

I put it to use right away making more French cleats for my walls. Which is a piece of wood that has the top cut at a 45 degree angle. I started off by hanging all the holders I made previously in my old shop. This included my plug and paddle bits, my hand tools such as side cutter and wire strippers, all my screw drivers and wrenches. Then I moved on to making new holders for new sets of tools such as my forester bits.


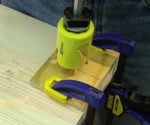
While a lot of bits come in their own very nice cases that keeps them organized, I don’t like things tucked away and hidden. I like things visible, and easily accessible. I did use the box to copy the layout of the bits though. I use any scrap of 1x material I had laying around and lined it up to the row of bits in their box then transferred the hole location to the scrap. Then I could take it to the drill press and punch a hole the majority of the way through.


Since I wanted two rows of bits on this one holder, I used the table saw to bevel the top of this scrap then Titebond wood glue to secure it to a piece of 1/4” plywood. This plywood piece is acting as a backboard for the holders to be secured to, so you can use anything you have laying around. I used brad nails to hold the pieces together while the glue had time to set up, and now you can see how it will work once I’m done. The bits easily fit in their place, I can keep them organized and tell at a glance if any are missing.

I repeated the process to make a second row right underneath the first. Now I could cut a cleat with a 45 at the top to mate into the 45 degree cleat I placed on the wall earlier.


Simple enough right?
I repeated the same exact process for my router bits. I used the layout in the box to layout my scrap board then turn it into a holder. On this one I made sure to leave plenty of extra holes in both 1/2” shank size and the 1/4” size because it seems like I’m always acquiring new router bits. However, when I eventually fill these up I can either keep making holders to expand left and right, or even replace these to include more layers downwards.

This is a very quick and easy way to organize any bits so the next time you have a few scraps you’re tossing out, take 15 mins to make a few holders then place them near the work area you would most likely be needing them. You could even take it a step further and write the sizes of the items in front of their hole so you know exactly what they are, or what’s missing if it isn’t put back.
Moving on to clamps. These have just been piled up on the floor like everything else so I started off by grabbing some 3/4 plywood cut off from sheathing the inside of my shop. You don’t need huge pieces for almost any of these projects, so remember to search through your scrap wood first.
I started off by marking off by measuring how deep a shelf would need to be to store four clamps, then I measured out a triangle that size. Since I’ll need a few of these, I rough cut my boards in squares then taped them all together to cut once at the bandsaw.


Next I used wood glue and screws to attach these to a backer board. I also used the help of two spacers to speed up this process but it goes so quick either way as it’s very easy.

Before hanging my clamps up, I first did something I should have done years ago but never took the time to do. When a friend gave me these pipe clamps, he made these wooden blocks for the pads. They not only extend the footprint of the clamps some, but they are also easier on the project when clamping down. You can see he used two screws to hold each wooden pad into place which is a good idea, but often the pad slips out. Instead of messing with the screws any longer, I applied a little Titebond Instant Bond, applied pressure for a few seconds then repeated on the other pad. This permanently attaches the wooden blocks and removes the headache of messing with keeping them under the screws hold.


To hang up the clamp rack I placed a French cleat on the wall, making sure to grab studs on this one since the clamps all together aren’t light. Then I hung up all my clamps. It’s surprising how little room they take up when they are organized.


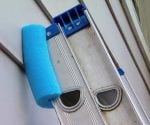
Up next was cord reels. I have a ton of outlets along my wall, which is great. But I placed outlets at every light so that I could eventually also have hanging cord reels over work areas in the center of my shop. These are Rockler Extension Cord Reels that are 30’ long that has a 12 gauge wire to support any heavier tools I want to run.
I decided to place two on my woodworking side and two on my metal working side. The first being right by my mobile workbench. Since I have a duel outlet by my light, I used the open outlet for the reel. Once it was secure into a rafter, I set the length of the stop so that I could easily walk under it without knocking my head, but also easily reach up and grab a hold of it to use.


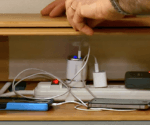
Oh one of my favorite small adjustments, just because I’ve never seen this gadget before, was the solution to this light problem. See when the door is open the light is almost wasted, and I wanted a way to isolate it from the rest of the lights on the circuit so that when my bay door is up, I can switch it off while the others remained on. I found these remote controlled outlets on Amazon that gives me the power to do just that. All I had to do was plug in an outlet to the outlet on the ceiling then plug the light into the new outlet. Now I can just hit a button my remote and turn the light on and off! I think that’s neat.


Annnnd the coolest part is I still have five other outlets I can use around the shop for this one single remote. I have no idea what those uses will be, but I’m sure something will pop up.
The last thing I did before calling it done was to organize the drawers of my tool box. I’m constantly needing to find a home for a lot of little things – from drill bits, to hair ties, to carmex and extra ear buds for my hearing protection… And this Rockler Drawer Organization System is by far the best system that I have come across for this task. As you can see, you can pull the units directly out of the box and easily click them together to form individual trays that is 100% customizable by either leaving the rows empty or positioning trays or dividers to suit your individual storage needs. The tray sections are actually made from a synthetic rubber so they can flex. And, you can actually use a pair of scissors to cut them to different lengths. Once the rubber trays are down, you can leave them as-is. Or, you can customize it even further by placing plastic bins or dividers anywhere along the notches in the trays.


And with that organized, I’m calling my to-do list done!
As I mentioned before, nothing too crazy and nothing too time consuming. But it is amazing how much more efficiently you can work once things are more organized. I will of course keep continuing to evolve my shop over time. And I will of course continue to show you guys updates along the way. In the meantime, I hope your shop is evolving and is a happy place for you, too.
The post 5 Shop Organization Projects appeared first on Wilker Do's.

