Wednesday, October 31, 2018

Chainsaw Mill: How to Slab Logs

Things I Used:

Last week I modified a trailer to go get some logs, this week I’ll be slabbing them up. As milling is an entire world of it’s own in the woodworking niche, I learned a crazy amount in just a few days and I’m going to try and cram as much of that information into this video as possible, so lets gets right to it. 

There are two main methods for milling logs: a bandsaw mill like Matt Cremona’s…

…or a chainsaw mill. I’m going with a chainsaw mill…..for now. Tractor Supply is now a supplier of Husqvarna equipment and I’ve partnered with them to use the Rancher 460 chainsaw with a 24” bar on my mill. Note that the chainsaw you buy has specs on the longest bar it can support. So if you want to cut certain diameter logs, be sure to buy a saw that can support it. 

I’m actually going to jump ahead because there are a lot of components to this one so let me show you the final outcome before I get into the details of each one.

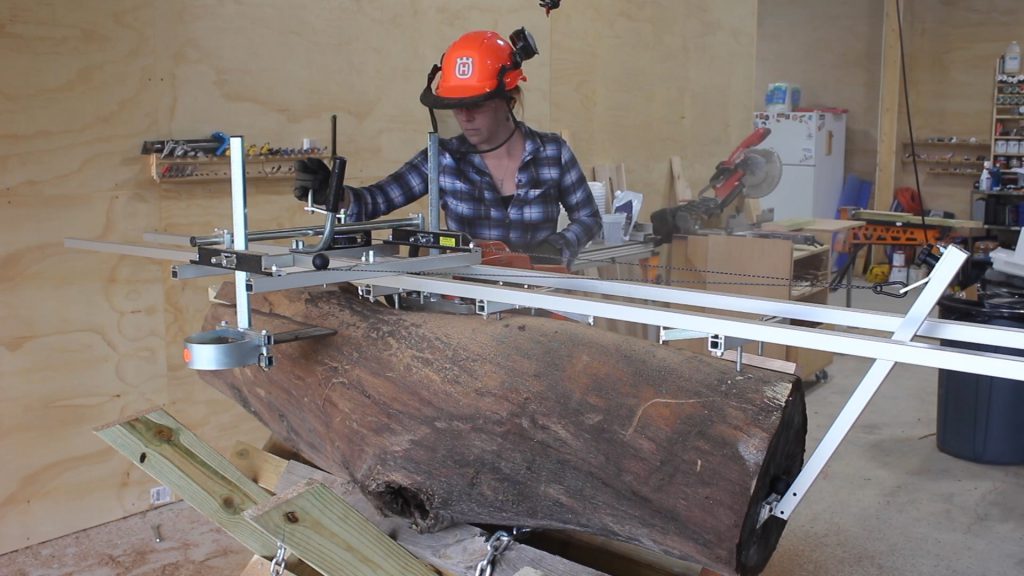
The components are: the chainsaw of course. Next is the mill which is a railing system parallel to the chainsaw bar that guides you for a straight cut.

On your very first cut, you need a flat reference for the mill to ride along, which is what these rails here are.

Then something I put on mine but is optional is a winch. This is mounted to the mill then hooks up to this bar you see here. 

Now that you see what I end up with, let get back to the beginning of putting it together. I started off with the rails that will go ontop of my logs to give my mill a flat reference for the first cut. You might have seen people use a ladder for this application before, but I went with rails made by the same company who made the mill I’ll be using which is a family owned business called Granberg. They are called EZ Rails and do come in a variety of different lengths but I went the 10’ rails which come in two 5’ sections that can be used separately or together. They have these cross bars with spikes and this is how the rails are attached to the log. 

Next I switched out the stock chain on my chainsaw, which is a crosscut chain, to a ripping chain. Just like any other saw blades, the teeth are designed with a certain task in mind and if you are going to go from crosscutting to slabbing, you need to invest in a ripping chain. The teeth are filed to a steeper angle on ripping chains since it’s a much more aggressive cut since you are cutting along so many more growth rings lengthwise.

After getting the chain on and tighten down, I moved on to assembling the mill that goes around the chainsaw. This is the railing system that is parallel to the blade, and it can be raised or lower to determine the thickness of your slab. Since I have a 24” bar I went with the 24” mill from Granberg. 

And just a fun fact, Elof Granberg, who started the company, designed the first Alaskan chainsaw mill back in the 60s. So anything milling related, the company has. 

You can see that the chainsaw now fits right into the mill then tightens down on the bar to hold onto it. 

Like I mentioned earlier, an add on I opted in for is a winch on the mill. This will drastically reduce the amount of work I manually have to do to get the saw through the piece of wood and I’ll show you how this works in a few mins. 

First I want to set all that equipment aside and quickly build a log stand so I don’t have to cut these logs on the ground. Since I’ve never done this before I wasn’t sure what set up would be best, so I went with some 2x6s with a steep angle cut in at both ends on my miter saw, then a hole drilled in the center. I flipped them around to be opposite of one another then stuck in a bolt with a few washers and nuts. I used two nuts so that I could keep this joint pivoting which will make the stand foldable. 

After repeating to make three the same, I lined them out, used a clamp to hold them in an open position with the feet flat on the floor, then placed another 2×6 to tie them together, and to also create a hard stop. A 2×6 was placed on both sides and now you can see it can fold up and be stored or transported, but then quickly deployed to be used. Depending on your length of logs, should determine how many of these Xs you include on your stand. 

Ok! After all that assembly I was finally ready to get a log set on my stand and to start milling. Cody used the tractor to snatch onto a log on the trailer then set it in position. Now the log doesn’t have to be perfectly flat but the next step is easiest if it is somewhat flat, so I first started up my 460 and took off a high spot. 

With this being the first cut, I started by placing my EZ Rails in place. Again, these will be the flat reference for my mill to get a straight first cut. I lined up the cross members so that the spikes, or dogs, would all land on the log then I hammered them in.

With it attached I next leveled up the rails. You don’t need them to be level along the length of the log, just across the log, I don’t know if you can see but there are two leveling screws at each one of these cross members to make this happen. 

Then the last thing to attach is the winch’s anchor point. If used, this is attached to the end of the log so that it can peak up in between the two rails. And you can see here that once you start the saw and get the mill set on the rails, the winch cable goes from the reel to this anchor point then attaches back to the mill. This allows me to keep my left hand on the throttle of the saw, and my right hand on the winch to advance or back off on the cut.

A few things I want to say:

1) Beware folks because this is highly addictive. I want to slab up everything now to where if you stand still long enough in my shop, I’ll start attaching the rails to you!

2) This operation can be done alone but it’s kinda a lot and is sooo much easier if you have a second hand around. You’ll see Brain there cutting wedges for me and placing them as I get further into the log. This is to keep the slab from pitching your bar and binding.

3) I tried moving the mill along without the winch just to see the difference and I’ll say that the winch makes such a huge difference in how much effort is required. I 100% recommend it if you get into this. 

After getting through my first cut (which took 6.5 mins btw), I set the top aside then started on the second cut. Now that the log has a flat reference along the top I no longer need the EZ Rails, I can just set the mill directly onto of my previous cut and start the process over again. The only thing I had to do before making this cut was to adjust the depth of my mill to the slab thickness I wanted. I set it for 2” then got after it. 

I am really shocked at how quickly I was able to get through an entire cut, this second cut took me just under 5 mins to make. The main components for making that happen is much like any other cutting tool in the shop…..the right power source and a sharp edge. This Husquvarna had no issues chopping through this oak, mesquite, or even pecan which are all pretty hard woods. This work does use up the bar oil though, so make sure you are keeping an eye on your tank.

Now I won’t lie, I was pretty disappointed at this oak when I got a look inside. I was hoping this thing would be beautiful but the log was apparently pretty old and very dried out so the inside was really cracked and honestly not something I was interested in keeping. Looking back on it though, I think testing and tuning, getting things figured out on a junk log is a pretty good way to go. Like anything else you learn so much on your first go and I still had a blast. 

I didn’t have any more long logs but my neighbor offered me a short pecan and mesquite log so I jumped at those to try next. You can see that instead of cutting the tops of my log stand down, I just shored up the bottom with some scraps. This is because I’m not yet sure what the average diameter of log I’ll be getting is, and I didn’t want to cut them too short but note that it is an alternative to filling up the bottom.

Something else I did when the log got smaller was use the log jaws in my Super Jaws. These are a set of jaws with blunted teeth specifically designed for grabbing onto logs. Oh and a helpful tip I got from Instagram is instead of placing the log level lengthwise, place it downhill so that gravity can help you when you are milling through. 

As far as keeping things sharp, I sharpened my chain after every third pass which might be excessive but I’ll learn with time where the sweet spot is on sharpening. In the past I’ve always used a file to sharpen the teeth but Grandberg has this 12v electric sharpener that attaches right to the bar. It hooks up to a truck or car battery so I used the battery from the log snatching trailer to run it. Even if you don’t get into milling this sharpener is worth getting. 

The last thing I had to slab up with this crotch piece of pecan, after making the first cut I stuck it in my super jaws to make the remaining cuts and just look at how cool this one came out!

The next step is to set the slabs aside to dry and a general rule is it takes one year for every inch of thickness. So a 2” slab should be left to dry for two years. For video sake, lets say it’s been two years and these are now dry and ready to be used to make something. 

I’ll first need to flatten the slab. Since it’s much wider than a jointer the most popular method for flattening slabs is called a router sled. You can make a home made jig but my friends over at Woodpeckers Tools heard I was slabbing and asked me to try out their new slab flattener coming out later this year. If you are familiar with Woodpeckers then you’ll know they excel at precision which is exactly what a flattener needs to get the best results. Everything needs to be level and stay level to give you a perfect cut across your entire slab so you don’t have a lot, or any post clean up work to do. The jig has two long rails that I temporarily attached to my workbench, then it also has a sled that sits onto these rails. Inside this sled is where a router base is set so that it can slide up and down the length. 

After taking my time to get everything set up, I positioned my slab and set the depth of my router bit to start removing material to flatten the slab. I’m using my Triton 2 1/4” Router since I have my larger 3 1/4” in my table. Then for a bit I’m using a 2” flattening bit and also a bit extender made by Infinity. If you don’t have this extender and you just have the bit in your router, it’s really common for the bit to run out of throw and not get down far enough to hit your slab. 

With things set up you can see how it works. The router base moves along the sled then the sled moves along the rails. Allowing you to gradually move over the slab in order to flatten it. That is a wicked cool tool if you ask me. 

If you have never flattened a slab before then here are a few things I learned from my experience. 

When working with a piece that has a slight twist in it, you first need to shim it up and keep it stable to flatten it. I would find the two corners that were rocking then stick in a few wedges.

Next I set the bit according to the highest spot on the slab so that it starts off with removing the high spots. This means you aren’t removing material everywhere on the slab on the first pass. The objective is keep removing all of the high spots pass by pass until you are finally removing material from the entire slab, meaning it’s all on the same level and is flat. 

I set the bit to take off about 1/8” material. Also remember that with a larger diameter bit, you will want to slow the speed of your router down. I have my router set to 2 out of 5. I start on one side of the slab, move the router across then bring it back. Once I bring it back I move the entire sled down the slab to advance the cut. And that’s it, it’s just a matter of repeating until I make it across the entire slab. 

Once I get the slab down to where I’m removing material from everywhere evenly, I change the bit depth for a final smoothing pass. And this is to just to cut down on some of the marks left behind from the rough cuts, but honestly if you keep your bit sharp you’ll be amazed at how perfect the surface feels.

I hope you found this informative. I cant believe the mount of information I learned in just a week! And of course, now I cant wait until I have my own inventory of wood that I’ve milled up myself.  Stay tuned for my next video which will be turning live edge slabs into furniture.

The post Chainsaw Mill: How to Slab Logs appeared first on Wilker Do's.


from Wilker Do's https://ift.tt/2qll9Z9

Ductless Air Conditioning: The Right Choice for Your Home? - Home Improvement – Today's Homeowner

Ductless Air Conditioning: The Right Choice for Your Home?
Ductless split air conditioning systems are easier to install than central AC, but are they are right for your home? Here's what you should know.

from Home Improvement – Today's Homeowner https://ift.tt/2qovzHf

6 Eco-Friendly Interior Paints for a Non-Toxic Home - Home Improvement – Today's Homeowner

6 Eco-Friendly Interior Paints for a Non-Toxic Home
Need interior paint? Here are six options to consider that have low or zero Volatile Organic Compounds.

from Home Improvement – Today's Homeowner https://ift.tt/2QakRQb

Having a Mice and Bed Bug Infestation Can Hurt Your Love Life, Survey Says - Home Improvement – Today's Homeowner

Having a Mice and Bed Bug Infestation Can Hurt Your Love Life, Survey Says
A new survey's results suggests that bed bugs and mice in a person's home can hurt his or her social life and love life.

from Home Improvement – Today's Homeowner https://ift.tt/2qhEV7U

7 Tips to Create a Comfortable Bathroom - Home Improvement – Today's Homeowner

7 Tips to Create a Comfortable Bathroom
Whether you're creating a bathroom from scratch or renovating, plenty of planning is necessary. Here are 7 tips to get started!

from Home Improvement – Today's Homeowner https://ift.tt/2zi4DgF

Monday, October 29, 2018

Protected: Metal Roofing Myths: Separating Fact from Fiction - Home Improvement – Today's Homeowner

Metal Roofing Myths: Separating Fact from Fiction
There is no excerpt because this is a protected post.

from Home Improvement – Today's Homeowner https://ift.tt/2AzdOuU

4 Types of Air Conditioners to Consider - Home Improvement – Today's Homeowner

4 Types of Air Conditioners to Consider
As a homeowner, if you’re not sure which air conditioner suits you the best, here’s a quick and helpful guide.

from Home Improvement – Today's Homeowner https://ift.tt/2D8MtSQ

3 Reasons Window Air Conditioners Could Fail — and What to Do - Home Improvement – Today's Homeowner

3 Reasons Window Air Conditioners Could Fail — and What to Do
The average lifespan of a window air conditioner is 10 years. Here's what you can do if the system gives you trouble during this period.

from Home Improvement – Today's Homeowner https://ift.tt/2PrsxAi

Saturday, October 27, 2018

Easy Log Slabbin Stand – 2×6’s and Bolts – Check it out!

Y’all may have seen recently that I’ve started playing around with log slabbin’. It wasn’t until I built the log lifting trailer, harpooned a couple of logs, then got them back to the shop, before I realized I would need some sort of stand to set the logs on while I slab them up. After combing through the inter-web for some basic design inspiration, I settled on a collapsible model made from some basic 2×6 material and a hand full of tools that would slip perfectly into a stocking stuffer for your special DIY girl or guy.  Here’s how it all came together:

I began by cutting some 2×6 to about 30” long with a 45 on each end. These pieces get joined together with a shoulder bolt which allows the pieces to pivot. Im using a 1/2” bolt with two nuts installed per bolt. The nuts get torqued into one another to ensure the bolt does not lose over time and it ensures the two pieces of material don’t get squeezed too tight and fail to slide past one another easily.

To drill the bolt holes I’m using a light Makita hand drill and these Daredevil Spade Bits by Bosch. Not only are they inexpensive at 20 bucks for a lot of 12 bits, but they also have some cool features that help produce a nice through hole.

The centering tip of the bits is fully threaded up it’s tapered profile which helps keep the paddle bit pulling through the wood. I surprised at how the bit feels as though its just driving itself through the material and how little I was having to push the bit through the hole.

Once all the holes were drilled, and the X’s were joined using nut and bolt hardware, I used a couple more 2×6’s as cross members to join them together.

Understanding how tall the top ends of the X needed to be was a bit of a gamble. I knew I needed something somewhat tall for a large log but if I cut it too tall then the top of the X would get in the way of my log slabbing mill. Basically, I was just shooting from the hip during the entire construction of this thing so it was no surprise I needed to do a little post process cutting.

To whack the tops of these 2×6’s off I used yet another inexpensive piece of gear that zipped right through the material like a hot knife through butter. Enter the Diabo 9”Wood Cutting Recip. Saw Blade. Diablo has been killing it in the recIip-saw blade industry lately and makes quality cutting super affordable.

Aside from the 2×6 getting cut to a more manageable length, I also cut down the extra thread on the bolt tails using another Diablo blade used for cutting medium metals with it’s carbide teeth. If you think that cutting metal with a sawzall sounds like a ride on a mechanical bull for your forearms you’d be for fitting the opportunity to feel just how smooth these metal cutting blades perform.  With their permashield coating and 10 tooth per inch design, these metal cutting blades really smooth out the entire cutting process and don’t leave your forearms feeling like jelly after a days worth cutting

The stand worked perfectly for my first log! I was so darn happy to have a slab of wood cut from my very own labor : ) Typically, one would allow a slab to dry according to its thickness before beginning to work with it. BUT! I recently got my hands on a new flattening jig from Woodpecker Tools and couldn’t wait to test drive it.

Flattening jigs can be made from basic materials and a router and work a lot like a conventional upright mill in a machine shop. Wit a large surfacing bit, you find the high spot of the material and slowly mill away material from the highest spot to the lowest spot to create a level, flat plane.

The only down side to this entire operation is the DUST! Holy moly does this process make a mess. I had sawdust every where! The mess on the work bench was knocked out pretty quick using another little tool that all shops oughtta have; a basic shop-vac. The Home Depot sent me this 4.5 Gallon, 5 horsepower Shop Wet/Dry Vac from Ridgid. It comes with 20′ of cord, a three layer filter,  and has enough sucking power to pull a golf ball thorough a garden hose lol….ok maybe not that much but this thing is plenty stout for shop use. Ridgid changed up the design on this model and made it look a bit more like a tool box which stores all of the bits inside small enclosures instead of crowding up the exterior like the conventional modes. With a little bit of work this thing knocked out my ultra messy workbench in no time!

Thanks for stopping in to learn a bit more about this kind of project as well as the handy tools. All of this gear is available through The Home Depot. This article is actually sponsored by them through their ProSpective campaign which involves paid content creators, like me and several others, who provide feedback, exposure, and reviews of current projects available to the market. Some of the links above are affiliate links and provide a small kickback for any sales associated with them. In a way, it helps to keep the entire machine running. Thanks so much for your support and stay safe out there!

Cheers – April

The post Easy Log Slabbin Stand – 2×6’s and Bolts – Check it out! appeared first on Wilker Do's.


from Wilker Do's https://ift.tt/2OQbhFr

Friday, October 26, 2018

Simple Shelf Made Easy With Some New Gear – Check it out!

My well house has been a “catch all” for a variety of old things Cody and I are holding onto for the “right project”. Steel boxes, tires and wheels….different odd ball things that are kinda bulky and taking up valuable space. Today I tackled a simple shelf made from untreated two- by material with a hand full of pretty awesome late model tools you put on somebodies “nice” list. This shelf design is made up of (3) 2×6’s and (2) 2×4’s and is adaptable to almost any wall, especially those with exposed studs. After it was fully loaded, I reckon there was probably about 200lbs up there and it didn’t budge. Here’s how it all went:

First things first, clear all this mess out of the working pace:

After heaving all the heavy cargo out of the well house, I got an inside dimension from wall to wall. Inside dimensions over an open space can be a little tricky if you’re dealing with a bowed tape. Since my well house does not have a floor, rolling the tape out on the deck wasn’t really an option.

Enter the laser measuring device. These things have been around for ages and this one may be one of the coolest ones yet. Bosch calls this unit the GLM 50C BLAZE 165 and it is one handy tool. It has a full color display that’s easy to see in low light conditions, it’s accurate within 1/16”, offers metric or standards dimensioning (decimal or fraction), and a whole host of handy features built within its sub-menus. With just a few strokes of the wrist along a couple of dimensions, this laser measurer can calculate area, volume, and even dub as a level.

I measured twice then committed to start cutting all the shelving material. For all the cross cutting I’m throwin another new tool into the rotation with this cordless unit from DeWalt. Back when I was building the shop I used a mini-DeWalt cordless circ-saw like it was going out of style. For a little guy, it worked really well but with a 6-12” blade it had some limits. This new saw is the big brother to my mini and packs some serious punch. It’ll plunge down to a full 2-9/16” depth and runs off a single 6.0 Ah battery. 

The brushless motor is silky smooth during cuts and is unbelievably quiet. To be honest, this was one of the main draw backs for the mini saw; it’s pretty darn loud. : / In terms of pushing the saw through the material, this saw feels as solid and refined as any other quality shoed SkillSaw or Makita (two of my favorite corded circ-saws).

With the top 2×6’s and lower 2×4’s cut to length, I began attaching the first sticks of material in place. I began with the 2×4 horizontal members that will support the shelf deck. These got faced nailed to the studs of the wall just above shoulder height. Here again, The nailing went in like warm butter with the help of yet another awesome tool from DeWalt. This one is a 20V cordless nailer that shoots 21 degree collated nails.

The nailer worked perfectly, but it took a little getting used to the time it takes to build up it’s baby compressor once the head is depressed. If you treat it like a conventional pneumatic nailer and shoot it as soon as the head is compressed, you will find you’ve outrun the clock and have to wait just another short moment for the optimal pressure for firing. For a project like this easy shelf, this is not really a problem but I could see that being a potential issue on a job site.

Before throwing the decking up on all the horizontals, I cut some 20” – 45 degree corner gussets to support the weight of the shelf. One end got face nailed to the stud and the other end gets a long 3” screw where the gusset meets the horizontal.

At this point I was ready to install the decking but was torn on two different approaches. Notch my 2×6 deck material to slide over the studs or no? I took a second to look at how that would work and made a quick cut with a Dremel multi tool. If you haven’t taken one of these for a ride you really ought to!

The high speed oscillator is one of the coolest tools to hit the market in a long time since it can get into some insanely sight spaces and comes with a huge variety of clever cutting heads. It also works well for making this inside pocket cut and creates nice clean inside corners. This multi tool is one of the latest to hit the market and features a tool-less blade change mechanism that really simplifies swapping accessory heads. Occasionally you can find bundle deals on these accessory heads like this package as well as this package.

In the end I decided to scrap notching out material for the studs since all of the items intended for the shelf are large and unlikely to need material all he way inside the stud bay. Nonetheless, the Dremel MULTI-MAX  is a must have tool for a variety of sanding, cutting, and finishing jobs.

The final step in this construction was required putting up the 2×6 deck boards. Now you might be thinkin this is a bit of overkill….and you’d be exactly right. But for the heavy chunky items I’m throwing up here, this shelf is going to work perfect. All the deck boards got sucked down with 3″ deck screws….which bring me to the the final piece of gear you could consider for that special crafty person in your life, even if that person is you : ) lol

Hardware storage is multi-faceted necessity of the creator’s life style. You not only need hardware storage solution for the shop, but you also need a quick grab and go solution for the times you’re going to be working well away from your shop….trust me, no one has time for silly little trips to the shop or the hardware store for simple things like bolts, screws or washers. Tah-dah! Enter the Small Parts Organizer from DeWalt. trust me when I say these things are way to cheap and way too handy to not give em a try! I’m talkin 20 bucks for the big one and 10 bucks for the small one. Easy Day!

These parts organizers are loaded with quality features throughout; over center toggle latches for a nice positive closure, clear acrylic lid that’s water tight and snug to the cargo compartments to prevent spillage of even the smallest washers, and you can stack and lock multiple boxes together for the ultimate grab-n-go hardware solution. My favorite part of the large box are the removable bins. Previous models have featured simple divider walls but the removable bin is the only way to go.

Pulling from the large well of deck screws, I cracked on with securing the deck boards in place. I set the outer board first, then butted the inner board to the studs, and finally just eye balled the middle board on center between the two.

Finally, I heaved all that mess up onto the shelf and called this project a wrap. I cant stand clutter!!…..and with a little help from some quality tools, I was able to nip this mess at the bud and not have to trip over these odds-and-ends when I need to get in to my well house.

Thanks for stopping in to learn a bit more about this kind of project as well as the handy tools. All of this gear is available through The Home Depot. This article is actually sponsored by them through their ProSpective campaign which involves paid content creators, like me and several others, who provide feedback, exposure, and reviews of current projects available to the market. Some of the links above are affiliate links and provide a small kickback for any sales associated with them. In a way, it helps to keep the entire machine running. Thanks so much for your support and stay safe out there!

Cheers – April


The post Simple Shelf Made Easy With Some New Gear – Check it out! appeared first on Wilker Do's.


from Wilker Do's https://ift.tt/2PqI3fR

Winterizing Your Home - Home Improvement – Today's Homeowner

House with snow around it
With winter here many Americans are looking for ways to save money on the rising cost of heating their homes. In addition, this is also the time of year when homeowners may want to take a look at some unwanted visitors who can do some real damage to areas of the home you may never see.

from Home Improvement – Today's Homeowner https://ift.tt/2CH9afN

How to Vent an Over-the-Range Microwave to the Outside - Home Improvement – Today's Homeowner

Venting an over-the-range microwave
Many times an over-the-range microwave that recirculates cooking fumes can be converted to exhaust to the outside. Here's how to go about it.

from Home Improvement – Today's Homeowner https://ift.tt/2O2EUy5

How to Remove and Replace a Damaged Ceramic Tile - Home Improvement – Today's Homeowner

Removing cracked floor tile
Removing and replacing a broken ceramic tile isn’t that difficult if you saved the leftover tiles from the original installation. Watch this video to see step by step instructions for completing this project.

from Home Improvement – Today's Homeowner https://ift.tt/2yIMs4n

Thursday, October 25, 2018

My DIY Master Walk-In Closet Reveal

Drum roll please. . . our walk-in closet is FINALLY DONE!

This project is an exciting one for me.

For starters, this makeover marks the completion of phase 1 (of 3) in our master bedroom.  Our neglected space is slowly getting a new “grown up” look and feel. Goodbye starter furniture from 10 years ago.

Secondly, this mama is ready for some major change and an organizational overhaul.

So it only makes sense to kick start #ProjectMaster with this walk-in closet.

This space is small but mighty. Coming up with a plan was half the battle. After doing research on different types of prefab modular closet systems, I realized the standard size units were not going to fit.

Instead, we DIY’ed our own custom closet built-ins from scratch, which we constructed out of plywood.  To maximize storage space, we created our units from floor to ceiling.

To keep things looking bright and sleek, the built-in design is kept simple and painted white.

The gold closet rodswooden hangers and plush rug add a touch of luxury to the all-white palette.

Long gone are the days where I tried to balance my heels on wire racks.

I finally have proper shoe storage.

And lots of it!

A custom closet wouldn’t be complete without drawers and a countertop. To break up the white, I added this fun colourful wallpaper from Milton & King.

The popcorn ceilings were smoothed out and the light was an inexpensive fixture I bought from my local hardware store. I spray painted it gold to match the closet rods.

White drapes are used to camouflage the oversized window partially covered by our closet unit.  The closet door is removed to create an open concept.

I’m so thrilled with this makeover.  Never in a million years did I think organizing your closet would be so life changing.  It really makes all the different.

My biggest hope is that these before and after’s show someone that they can turn their dark cluttered mess into something that gives them life.

Click through these links to see more from our master closet series:

Designing my walk-in closet
5 Things to know before revamping your walk-in closet
Installing our built-in closet system (with pricing)

The post My DIY Master Walk-In Closet Reveal appeared first on Pink Little Notebook.


from Pink Little Notebook https://ift.tt/2JioY9Y

Keeping Your Home Protected with a Metal Roof - Home Improvement – Today's Homeowner

Keeping Your Home Protected with a Metal Roof
Why you should consider picking a metal roof for your home

from Home Improvement – Today's Homeowner https://ift.tt/2O1r1QJ

Protect Your Home with a Metal Roof - Home Improvement – Today's Homeowner

This year’s extreme weather has homeowners everywhere looking for ways to make their home more durable. A great place to start your search is with Metal Roof Alliance. Many homeowners are considering moving from a traditional roof to metal and for good reason. Both reliable and strong, metal roofs give your home the best protection […]

from Home Improvement – Today's Homeowner https://ift.tt/2OPnMAX

Wednesday, October 24, 2018

Building a Log Hauling Trailer

Things I Used

Maybe it’s because I now live in the country, or maybe it’s because I’ve been hanging around my buddy Matt Cremona too much….but I want to play around with milling some logs. I intend to build a chainsaw mill next week then tackle the giant Matt Cremona bandsaw mill in early 2019. Before that though, I need to modify a trailer so I have a way to go pick up logs and haul them home. That’s what I’m doing this week.

The premise is to make and attach an arch to the back of a trailer that can pivot forward and backwards. You connect a winch to the arch, then you can tilt it forward to grab onto something, then winch the arch back to pull it up and onto the trailer. 

Now that you see what I’m going after, lets get into building it. 

This project might seem big, and I suppose it is in size, but it’s actually a pretty simple build. Also, I’m using it in this case to haul around logs but it’s also worth mentioning that this design would be good for lifting and hauling anything that’s big and heavy that you can get a chain around. I personally have a lot of rocks on my place I’ll be going after next. 

I started off by cutting the tubing I’ll use for the arch to length. I’m going with 1/4” material for almost this entire build. We don’t have the stellar tree diameters that you in the north do, but I still want to build this thing heafty so I’ll always have the power should the need arise. 

For the mean time I only cut the four bottom parts of the arch. I didn’t want to weld the complete arch on my shop floor then the risk it not fitting exactly right on the trailer. So next I started prepping these parts to be welded. I started by sticking each one in my Triton SuperJaws and grinding in a bevel on all the edges that would be welded to another joint. 

Then I moved the parts back down to my floor and stuck them together. I first tacked them into place then welded them close. For this project I’m using my Power Mig 210 MP Machine and if you’ve been wanting a welder it’s worth noting that this machine is currently on sale. You can save over $400 until November 8th, 2018 by using the promo code PM999 at check out over at LincolnElectric.com

Now Cremona has his arch mounted permanently to his trailer, but not yet knowing how often I’ll use mine, I wanted the arch to be removable. I’ve been traveling a lot recently so Cody actually tackled designing this removable system for me. Then on top of that he even cut out the parts needed with my Torchmate CNC so everything was ready for me to assemble. Annnnd he even got footage of it! What?! What a guy. I do have these tool paths available for download in the plans section of my website if you’re interested. 

These mounting brackets have a bottom plate that will be attached to the deck of the trailer, then two vertical plates that will sandwich either side of the arch. Then all three components will get a hole so a pin can be placed all the way through. This will create the pivot needed but also make the arch removable should we want to use the trailer for regular hauling. 

I started these off by lining out the placement of these side plates,  the important thing here is to make sure they are parallel to one another. You wouldn’t want that arch pivoting up and having an interference issue. 

I’m using a 1” diameter pin and to give it a little more support than the 1/4” plate material, I welded on some collars, just cut from a 1” steel pipe, onto the outside of both side plates. 

Next I set it onto the trailer and threw a level on it. Not surprisingly, the deck of the trailer needed some attention before the plate would be level. Note: you do want to make sure your trailer is level before reading level on this bracket. To fix my unleveled situation I used my 4” belt sander to take down the high spot on the deck. After fine tuning the left and right I moved on. 

With that done I moved to working on reinforcing the bottom side of the trailer with some steel. For this I’m going with 1/4” angle iron and the important thing is for this angle iron to line up with the holes in the mounting brackets. Instead of welding the brackets to the trailer, they will be attached using nuts and bolts so they too will be removable. The arch will be removable with the pin but should we need/want to remove these brackets as well, then we easily can. 

So back to placing this angle iron, I first transferred over the hole location from the mounting brackets to the side of the trailer. Then I cut the angle iron to length and stuck it in place…be sure to leave room for not only the bolt but also the washer. I used some scrap wood to build up the deck some so I could get a clamp in place to hold it while I set up to weld. 

I placed a piece like this in line with the front holes as well as the back. Then started drilling the holes through the deck and through the angle iron. I am using 1/2” hardware but started off with a small bit then stepped up a few times until getting to a 1/2” bit. Oh and the important thing here is to make sure these plates are parallel to one another, just like the plates on the brackets. You want everything on the same line so that the arch doesn’t run into anything going up or coming down. 

Once all eight holes were drilled, I stuck the hardware in then tightened everything down. 

Now while I was working on all that, Brain was working over at my puny drill press, punching a hole through both of the uprights. It was a 1” hole through 1/4” material so it was a job that required patience. By the time I was done with the deck, he was done with the holes so I took the uprights and smoothed out my welds with my grinder before pinning it onto the trailer. 

To attach them to the trailer, I set it in place between the two vertical sides plates on the mounting bracket. Then moved to the end of the leg so I could lift up on it, align all three holes, then shove the pin through. It’s worth noting these pins come with a hole in the end to place another pin to keep this pin from coming out. Which of course is a good safety. And now you can kinda see how it will work….

After getting the other side mounted I squared up both uprights to each other and the mounting brackets, then took a dimension for the final arch piece. I cut it to length then welded it in place. It’s not only easier moving the arch into place, building it this way but it’s also a safer bet over fabbing it on a shop floor, moving it into place on the trailer, and hoping everything lines up. 

With that welded up, the last bit on the arch was to weld on some gussets over each one of the seams. These I hand cut with my Tomahawk plasma cutter because I used thinner material. For these I went with 3/16” material. I only placed these on the front of the arch so I have four total. The middle two were easily done with the arch laid down but the fender wheel of the trailer got in the way of the outer two so I stood it up to complete these. 

Now while I worked on the arch Cody and Brian were figuring out how to mount a winch to the trailer so it could work! I actually went out of town the day they were working on his portion and unlike earlier, they did not get me any footage, but here an overview for ya. 

Cody cut out a giant plate on the CNC plasma cutter to fit in the tongue of the trailer for the winch to sit on. He welded it to the bottom side of the trailer instead of the top side so that when the winch is under load it will be getting pulled into the tongue vs being welded from the top it would just pull against the welds. 

The winch and battery were mounted then a heavy duty D Ring was welded onto the arch to create a grab point for the arch. 

And that’s pretty much it! Next we just had to go find a log to test it out. A buddy offered two down oaks at his place for us to remove so we loaded up and took off. They both had giant root systems still attached so I first cut those off to make hauling them up on the trailer easier. 

I’m already considering some add ons to make hauling easier. Somebody on Instagram suggested adding Jacks to the back end of the trailer, which I think is a great idea. Then I’m also playing around with the idea of ramps with rollers in it to make getting the log up and over the trailer lip easier. But we’ll see! Of course if I do any modifications I will be sure to bring you guys along.

If you have doubts about what something like this can handle then be sure to check out Matt’s Instagram and YouTube channel as he lives where the beast trees are but his arch trailer hasn’t met one it couldn’t handle yet. Also he has been into urban logging for years and has a ton of knowledge on the subject. 

That’s it for this one. Watch my video above for a better look at this project. And stay tuned for the next video where I build a chainsaw mill and slab up these logs. I’ll see you soon. 

The post Building a Log Hauling Trailer appeared first on Wilker Do's.


from Wilker Do's https://ift.tt/2q73AMe

How Covid-19 Affects the Housing Market in College Towns

The Covid-19 pandemic has led to major lifestyle changes. That could significantly impact the housing market in college towns, according to ...