Shaker cabinets' five-piece design makes them a popular, timeless choice for kitchens. Watch this video to learn how to transform cabinets to Shaker style.
The hummingbird moth is often mistaken for its namesake, but this insect has distinct differences from its namesake. Here's what you should know about them.
If you missed my last video where my friend Greg and I demoed his existing porch and deck, then rebuilt the deck, then you can find that video HERE. In this video we’re continuing the process by rebuilding the porch. Ok here we go!
When we were demoing the old porch, the only part we held onto to reuse were these giant white oak posts. Actually, Greg is also a Sawyer and actually milled these posts himself.
We detached them from the rubble then set them in place one by one. Making sure to place these on top of the beams of the deck so the they were on solid footing, then we set two braces in place to get it nice and plumb.
To start, we would first make sure the post was sitting square to the face of the deck, then using a post level (which reads level on two faces at once) to move the post into plumb.
While one person was reading the levels, the other person would be squeezing down on the clamps to hold it in position. After checking it one last time that nothing had moved, we threw a few screws in the braces. If you don’t have a post level then using a 4’ level on two sides also works.
After we got the second post set, we next moved to the top and set the header to hold them into position. We could have gone through and first set all the posts, then gone back to do the headers but instead we built the porch by working left to right, and going through all the stages before we moved all the ladders and scaffolding over.
Once the header was in place, then we started throwing up the rafters.
Well not right away, we first needed to figure out the the angle and depth of the back cut to allow the rafter to sit on the header attached to the shop, then also the front birds mouth cut to allow it to sit on the header spanning the posts. We started off with positioning one rafter in place to get both of these figured out and marked, then we cut it and test fitted it to make sure it worked.
Once it was good to go, we marked this one as our template and used it to duplicate the cuts on all the other needed rafters….which was a lot.
Greg and I ended up finding a really good system for cutting these out quickly though. He would grab a new board from the raw material stack and set it on the tailgate (which is a wonderful job site workbench by the way).
He would then place the template on top of the new board and get things lined up then he would use the circular saw to cut the end to length, then also make the majority of the cuts for the birds mouth.
While he was doing that, I would make the finish cuts with a jigsaw to end up with clean 90 degree corners.
It’s easier to use a circular saw and just overcut the corners so that you don’t have to use two tools, but that messes with that weakens the connection so since this is something that will be around for a long time, just take the extra time to make it clean.
After switching sides and both our tools finishing their needed jobs, I would take the completed rafter and set it in place over at the porch while Greg grabbed the next board so we could repeat the entire process.
I always feel like processing material is a big slow down in the project but the great thing about getting things staged like this is it makes the next step fly. With the rafters all ready to go and lined up, Greg and I could position our ladders and very quickly start installing them.
Our system here was Greg passing over the tail of the rafter to me while he walked up his ladder. I would position it on the header and secure it in place. I don’t know if you can tell but I have a spacer here to avoid having to pull a tape to set each one. I would use the spacer to determine the location then once I pinned it, I would throw it move it out of the way, finish securing it then use my spacer on setting the next one.
Greg didn’t have a spacer at his end. Well he kind of did. See, the front of the porch gets blocking in between each rafter. This is a board cut to length to fit in between the rafters but it gets secured in place. This not only gives ridigty to the rafters to prevent them from being able to roll, but it also closes off the gap that’s created between the top of the header and the top of the rafter. Just to keep birds and such out.
One addition that made this step easier was Justin, who is the videographer, ended up passing the rafter up to Greg which saved him a trip up and down the ladder. With the third hand, we could actually attach two before we had to shift the entire operation down some.
Once we installed all the rafters we could on the two posts we had installed, we would both hop down then install the next post…..the next header….then repeat with the next set of rafters.
We completed the rest of the porch by working in bay sections like this. And this is probably my favorite part of the project, I love stages that you can really see drastic change and progression.
To give you an idea on timeline, the deck took us two days to complete, then so far all of this progression was a days work, so things really do move along quickly.
Then before calling this step complete we went to the two ends of the porch and attached an additional rafter to cap it off. These are in line with the house and will act as the subfasica.
Not too shabby huh? But it isn’t done yet, now we capped the front of the rafters with another 2×6. This board is called the Fascia.
We would first pull a tape and figure out what the board needs to be cut to, to land on the center of a rafter. Then face nail it directed into the ends of each rafter. Just a tip: Use a speed square or another straight edge reference to align this board. This will keep your roof in one line and avoid a bump that would be created if you flushed up the rafter by hand.
The next day we started off by tying all the rafters together with perlins. These are 1x boards that are spaced apart every 2’ and these not only tie the rafters together, like I said, but also gives boards in the center of the roof to screw into on the next step when we start attaching roof panels.
This is such an easy step, it’s literally just placing the 1x in place, making sure it falls on the center of a rafter, then nailing it down….but it takes forever! Because it’s a ton of crab crawling around which is surprising really tiring. I would work from one side of the roof to the other, then from the front of the porch uphill to the back. When I got to the sides I would let the perils run wild then after they were all installed, I used a circular saw to trim them all flush.
Next, bring in the roofing panels! Greg went with standard metal roofing panels and since he has a tractor he first placed them on the forks to lift them in the air for me to just grab then place into position.
After laying down a sheet, he would inch the tractor forward so that it would be in line with the next needed position so I could pull it directly off and on.
Since this was really just a one person job, I handled the high work while Greg tackled building a set of stairs for the deck.
After getting a sheet laid down with one corrugation overlapping the previous panel, I would secure it with screws. Going into each one of those perils that I set in the previous step. When you buy your roofing material it should come with screws in the same color. These will probably have a rubber washer under the screw head so that when you seat the screw in the metal, it will seal around the hole you’re creating and not leak.
I’ll tell you this….it’s a remarkable feeling to sit underneath shade you create with your own hands. I think it tickles something primal in our DNA that steams back to the instinct to create sheather…..ha, I don’t know, or I’m just odd….but it was outstanding to sit in our self created shade and eat lunch that day.
After taking a break, we got back to work though. As you build a structure like this, it’s fascinating to feel the progression as well as see it. It starts off flimsy then every step adds more and more rigidity to where at this stage trying to move/shake the structure feels 100 times better. Even though it felt strong, Greg’s old porch had these beautiful braces spanning between the posts and the headers so we quickly went to his shop and made a few more. Greg just free handed the design then we used a combination of a bandsaw and miter saw to make the shape happen.
: ) if you want to stay up to date with what I’m building in real time, be sure to follow me over on Instagram or Facebook.
Here’s a before shot:
And here’s the after!
That was all we were able to get done in the few days I was visiting but since leaving Greg has put a lot of the finishing details such as painting it, adding soffit, lights, and even some plants.
We celebrating wrapping up this big project by moving a table on the porch and having a family dinner on it and that was really the cherry on top of a great rewarding week.
If you have a porch on your list than I really hope that this helps you out! Be sure and watch the video above for even more details. Also, check out Greg at the links below. He offers tons of classes on chair making in this wonderful heaven of a shop of his.
Hope you’ve enjoyed this one and I’ll catch you on the next one!
A replacement heating and cooling system, which most people want to delay purchasing, could cost $4,000. Your AC will last longer if you follow this plan.
An air conditioner is a must, regardless of the season. If you're not sure which type of AC unit to buy, here's a guide on four of the most popular units.
Staying cool is on the top of most people's minds during the hot summer months. But what if your air conditioner isn't working properly, or you don't have one at all? Try our tips to keep cool!
In this video I traveled to Nashville TN to help a good friend of mine rebuild his porch.
If you’ve been watching my channel you’ll probably recognize the name Greg Pennington. He is the master chairmaker that I’ve taken a few classes with and the last time I was there he mentioned wanting to demo his existing porch which is only 10’ deep and rebuild it to be 16’ deep. It’s a huge job and right up my ally so I offered to come back for a week and help out. While it’s being rebuilt, Greg also wanted to change the direction of the deck boards to run perpendicular to the shop vs paraell. The change in direction will drastically help make a smoother rock for the rocking chairs he makes with his students.
Since Greg has an exiting structure the first thing we needed to do was demo. The goal was to remove everything and start fresh. I hopped up on the roof with a circular saw and a Diablo Demo Demon blade and made a cut about a foot from the header that connects the porch to the shop. If you have any sort of demo work, I highly recommend picking up one of these blades as it’s design to cut through anything. Here I’m chopping through ashphat shingles, nails, plywood, and joists.
Now the plan was to chop up the porch in sections that could be carried away with the tractor. So next I used the circular saw to go from my back cut line to the front of the porch.
With my blade all the way down, I was able to cut through most of the material but not 100% of the 2×6 joists or the front header of the porch. So I came back with a sazall next, this time using a Diablo Demo Demon Recip blade for this tough job, and finished making the cut.
When I got close, Greg would set the forks of his tractor under the section so that when I cut through the last bit, he was there to catch it and carry it off.
We learned from the first one that just using the forks was a little difficult because they would want to punch through the roof too easily since the wood was a little soft from water damage. So while I was chopping up the next section, Greg made a jig to span the forks and create a more even footprint when picking up the next section. Then we repeated, just breaking up the porch into sections that the tractor could carry away.
I would make the cut with the circular first to establish the line, then use the sazall to cut the rest of the way through the longer members of the structure.
With the bulk of the porch gone now we could hop up on scaffolding to remove the tail ends left behind that I was using as a safe walking platform while chopping up the rest of the roof.
Since we are going right back up with a porch, we wanted to remove everything except for the header but we’ll reuse the header for the joists of our new porch.
Now let’s demo the deck before dark. We tackled this in the same fashion! I first made a long cut along the house, then multiple cuts going out to the end of the deck so it could be broken up in sections and carried off.
After getting the big bulk removed all we had left was to remove the small tails of each joist just like we did on the porch. Again, we left the header in place since we’ll reuse it.
On to rebuilding! The first thing we need to do is set our beams that the joists will be connected to. These are going to be connected to the header we left into place in the last step with joist hangers and here is a method for easily figuring out how to determine the height of your joist hangers: Greg held up a piece of the floor joist material as well as a scrap from the thickness of the deck boards that he temporarily held up as a dry fit. This will determine the height that you need to set your joist hangers at.
It’s important to get the height correctly here so you have a smooth transition, without a step up or down, into the building once the deck is complete. I recommend screwing in the first side then using a piece of 2x cut off scrap to get the width correctly then screwing down the second side.
Now we can set the back end of the beam in place and figure out how much build up the front end will need in order to be level. To do this, set the back end in the joist hanger then place a level on the front. While one person reads where level is, another can be reading a tape to see what the height needs to be.
Once that is determine you can use an assortment of material to create this build up. On the taller ones we used the standard off the shelf cement blocks, but on the shorter ones we laid some gravel down and use a small brick paver. Since this is in direct contact with the ground, using something other than wood is best.
You’ll also notice that we doubled up no the beam material.
I recommend looking up span charts for the distance you are trying to cover and that will tell you what dimension of material is rated for the span. If you do have to double up on material, then use a clamp to tightly squeeze the boards together then go through and nail them to each other.
This can be tedidious work but if you take your time and make sure your beams are square to the building, and to each other, and also level, then all your other steps will be so much easier.
Next up is attaching the joists, which run perpendicular to the beams and connect from inside to inside with more joist hangers. The first step in this stage is to lay out where the joists need to go. We went with 16” on center but depending on your length of deck and material choice you might can do 24” on center. We would pull a tape along the beam and first make our marks so that next we could come back and attach the joist hangers at their needed location.
I recommend the same process as before to attach these. First drive in a screw on one side, then use a scrap piece of 2x material to open the hanger to the needed width before driving in the second screw. You don’t want it to be so tight on the scrap that you’ll have to struggle to get the joist in, but you do want it close.
You can also use a cut off of whatever material you’re using for the joists to determine the height of these hangers. You want the top of the joists to be perfectly flush to the top of the beams.
After getting done with one bay, we repeated on all the others…..whew, that’s a lot of joist hangers.
Now! If we did everything correctly, we should be able to set up a miter saw and start cutting all the joists to the same length then slip them in one by one into the hangers.
This is where taking the time to square up the beams really pays off. If you’re out of square, then you’re numbers will be all over the place and you’ll have to measure each one individually. I recommend setting up a stop block on your miter and having one person cut then another person attach.
I threw in a Diablo 60 tooth fine finish blade on my miter saw, which has their carbide teeth which increases performance and leaves an incredibly clean cut. Then on my circular saw, I switched out the Demo Demon for the 24 tooth Diablo framing blade, which has Diablo’s tracking point tooth design. This not only provides straight cuts, but also 5x longer blade life. It’s my go-to circular saw blade when framing.
The hangers have hole locations for nails but since we’re using a nail gun, it’s far easier to toe nail in the board so while I set the joists in their pockets, Greg would be attaching each one.
Our next step could actually have been skipped but it doesn’t take that much time and actually makes a huge difference. Before moving on to decking, we went back through each bay and adding in blocking. Which is just a board that spans in between joist to joist. In fact, I was able to cut all of this blocking from the cut off portion of the joists so definitely keep your larger scraps around until the end of project because you never know when they will come in handy. These are face nailed into the joists themselves roughly at the center of the bay. You can see that I’m staggering them so that each one can be face nailed in instead having to toe nail one side.
Alrighty, that completes the sub structure of the entire deck, now lets move on to the decking stage.
Oh actually, before moving on the decking, we moved to the front of the deck and attached the drop guthers. These boards will cover up the front end of the deck, giving it a nice clean look. It’s also stiffens up the front of the deck by tying together each one of the beams. These are attached really easily by holding the top flush to the top of the beams and then screwed on. Cut the boards so that the ends fall on the center of each one of the beams.
Ok, and noooow onto decking. Like I said at the start, Greg wanted the deck boards to run perpendicular to the shop so that his rocking chairs could rock easier. With that, we started on one side and just worked our way to the other.
We are using treated 2×6 material that is 16’ long and these are screwed down into each one of the joists. Screwing the boards down takes a lot of time however, by going with screws, the deck boards will not pop up over time so I think it’s worth it. The system that we worked out is to stage a good amount of boards in front of our workable area so that Greg and I could just pull from the pile and start screwing it down. The end that matters here is the end closest to the porch, its important that this end is butted up tightly to the shop. The other end can just fall wherever it falls off the deck!
This is called letting it run wild. Because after all the deck boards are placed and attached, we’ll pop a chalk line and cut all the ends to be in a perfectly straight line….so don’t even worry about that end of things at the moment.
Another thing to pay attention to is if the board is bowed. These boards are treated and will shrink once they dry so we didn’t leave any space between them. With that, when a board was bowed out in a section we would do what we needed to do to get it as flush with the previous board as possible.
It’s also worth mentioning that to quickly get through this step we only put in screws on our respected ends. So we would throw down a board, Greg would put in a screw on his end, I would put in one on mine, then one of us would throw one in the middle somewhere, then we would throw down the next board.
We did it this way so we could eat through this step quickly while we still had day light. Then over the next few days, any time one of us needed to kill 15 mins, we would go put in some filler screws on the remaining joist lines. It’s just a way to keep the project moving.
After all of the deck boards were laid down, we could determine what overhang Greg wanted on the front end, pop a chalk line, and then use a circular saw to straighten up that wild end.
It was a crammed pack two days and we covered a lot of ground in that time frame. It was certainly rewarding to see how much work we could get done in that amount of time.
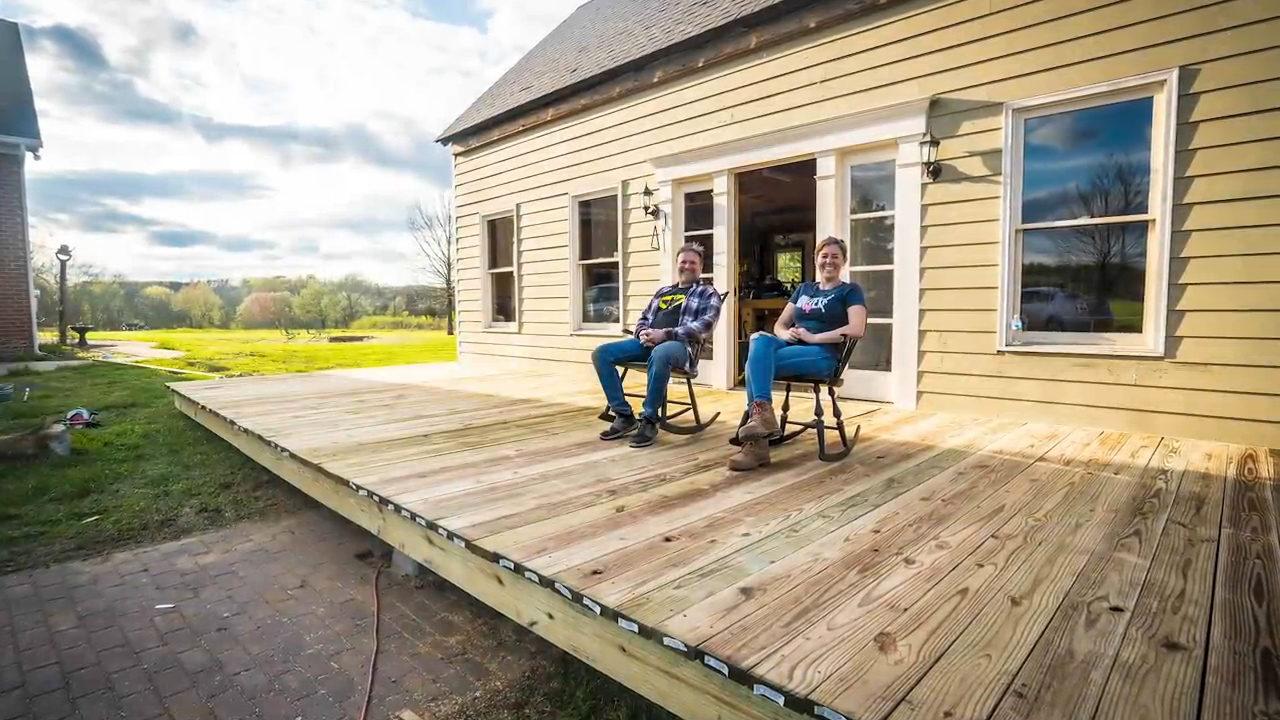
It was also rewarding to move out some rocking chairs!
If a deck has been on your to-do list, I really hope this tutorial has helped you out. Definitely check out the video above for more details. And stay tuned for the next video where Greg and I build the porch onto the deck!
If you haven’t already, don’t forget to sign up at the top of this page for my newsletter so you don’t miss new projects!
(Most of the links listed above are affiliate links. As an Amazon Associate I earn from qualifying purchases. Thank you for supporting me in this way.)
Find out how to perform five important DIY maintenance tasks on your air conditioner to help avoid emergency breakdowns and save money on your energy bills this summer.
Algae, mold and mildew can build up inside an air conditioning unit's condensate drain line and form a clog. Watch this video to learn how to prevent this.
Just changing the ceiling fan direction can reduce your air conditioning bill. Watch this video to find out how to stay cool and save money this summer.
People often say ‘cement’ and ‘concrete’ interchangeably, but these words have different meanings. Here’s what you should know about cement vs. concrete.
If you’re looking for an eco-friendly primer with no VOCs, this one should be on your list. Watch Jodi Marks' review of PPG General-Purpose Primer Zero.
Conducting a regular mold inspection on your roof is vital to catching damage early and preventing big issues later. Here are 6 places to look for leaks.
Summertime is in full swing, which means lots of outdoor activities. So, in this video, I’m going to be showing you how to make a set of Bag Toss Boards.
You can get really creative for a paint scheme. Or you can leave it plain. I dressed mine up like a flag to be festive for the 4th of July.
Check out the video above to see how I did it!
If you’d like to build this project yourself, I have a set of free plans that you can find here: https://bit.ly/2Vtk2GR