I built this chicken coop last summer and have been loving my chickens but I don’t like having to come out first thing every morning and every evening to coop and uncoop them. If you don’t know, chickens will go inside their chicken coop every evening on their own around dusk. But I still have to be here or come out here to shut the door and keep them safe.
So this week I finally tackled building my own automatic chicken coop door. It’s on a photocell so when this device here senses light, it will open the door and let the girls range.
Then when it no longer senses light, it will shut. I was worried about cloudy days but so far there hasn’t been any issues with it!
If you’re interested, I have a set of plans available that has a full material list. You can find the plans for this door HERE and also the plans for my coop HERE (or at the bottom of this page).
Ok, I started by making the door. For this I’m using scraps from my shop and just gave them a few good coats of paint.
All of the components for this build will be hidden under the chicken coop itself then also under the nesting box so I’m not overly worried about using untreated wood.
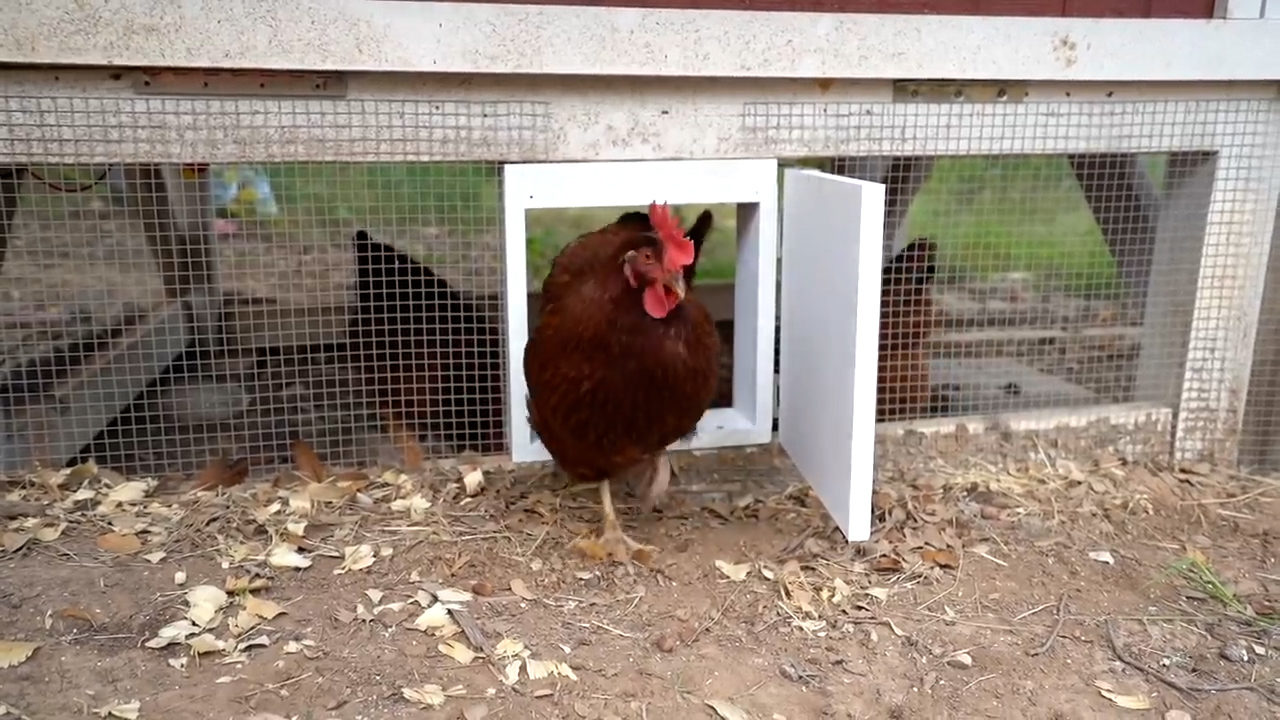
The door itself is very simple, it starts as just a simple box. Next a door is added with two hinges.
The linear actuator is one of the main components that makes this whole thing work. You can go cheap on these guys but if you’re shooting for quality and something that will last then I recommend going with this brand called Progressive Automations. They have a huge variety of not only linear actuators but also other electronic items. Also, it’s worth noting that they have great customer service that are happy to help pick out the item needed for a certain job in mind.
I added in a few more painted scraps to the top, to create a cubby for the actuator to go in.
The actuator will extend out and contract in, which is what controls what opens and closes the door. To attach the two components, I used an L bracket.
I screwed it to the top of the door first then positioned the actuator.
For attaching it correct, the actuator needs to be fully extended. I’m using a transformer temporally to give it power. This is such low voltage that you don’t have to worry about getting shocked. If you hear clicking but no action then reverse the connections and you should see it work.
Perfect, with that done, I clamped the door firmly shut as that’s the position I want to establish when the actuator is fully extended. Once slight pressure is applied to the bracket, the back of the actuator can be screwed down and secured.
Lets test it out and make sure it’s working as it should.
Ok so when installed on the chicken coop I’ll be using a solar panel and battery to power the operations, but first I wanted to wire everything together on my workbench to make sure it worked before going through the actual install.
With that, I added in a relay which is the switch to extend and contract the linear actuator. Then also a photocell which is the component that will sense light and trigger the switch from open to close or visa versa.
With the concept proven and the how to figured out, next it was to install it on the chicken coop. I’m placing all of my important pieces under the chicken coop to keep it out of the rain, which includes the linear actuator, the battery and the relay.
Oh, I also added in a fuse between the battery and the actuator….to add in the door, I cut into my chicken coop wire, added in two studs then slipped the door right into place.
For the photocell to work, it’s placed higher up on the coop and facing West to catch the evening light.
The chickens start going home around night fall and the door stays open until a little bit past that.
If relying on the sun makes you uncomfortable then another option would be to have a timer placed in the system. I didn’t go this direction because I didn’t want to change the settings when the time changes.
I really hope you enjoyed watching this project come together and if you have a coop then I hope you’re inspired to make your own automatic door.
Be sure and watch the video above for an even better tutorial.
New homes are more energy-efficient than ever, thanks to construction improvements that seal them tight. But these home-building innovations also negatively affect indoor air quality. That’s because the latest construction techniques that keep outside air and water outdoors, where they belong, also trap stale, polluted air inside your home. Fortunately, it’s possible to enjoy the […]
Electronic appliances, equipment and wiring can create hazards and cause electrical fires, serious injuries and property damage. Here's how to avoid them.
If you’ve been following my journey, you’ll know that I purchased a metal building and am turning it into a retail space and production shop. I’m calling it The Wood Shed.
This is footage of the side that I intend to be the retail space. I’ve already done a ton of work to empty it out and demo some walls, but now even more changes need to be made to make it a more functional space.
I want to insulate it, I want to sheath the walls in wood so they can be usable for shelving. I want to take out one giant bay door, and also relocate the front door. All of that is a massive amount of work, but can very easily be achieved so lets get started.
Lets start with framing walls
This was a looooot of wall space to frame, but the only way to get it done is to start. And the great thing about framing is it’s the same process regardless if you’re doing a small 60 sqft space or a 2000 sqft space. So it’s a skill that once learned can be implemented time and time again.
The reason for going through the effort of framing the entire inside is because the metal bones for one don’t give the space the look I want for the retail space, but also the huge wall space is completely unusable as is. Even if this was left as a shop space, I couldn’t just walk up to a wall, drive in a screw, and hang up an extension cord. To get that ability, the walls need to be sheathed which means each bay needs to first have the sub structure to support the sheathing.
The original plan was to use insulated batts for the insulation step so we originally laid down a plastic wrap on what will be the inside of the wall. However you’ll see that later we remove this plastic because I changed my mind and went with spray foam insulation instead. But, if you need a moisture barrier than laying down a sheet of plastic and using a stable gun to attach it, is nice and easy.
We would do this with the wall still on the ground, then stand it up one by one. To keep them standing up, we would use a nailer to pin it to the adjoining wall, then also pin it to the concrete through the base plate.
After repeating this for the entire length of wall, we repeated on the next one, then the next one. You’ll notice the walls don’t extend all the way up right now. What we did was use 10’ studs to get the bottom layer of wall up, then later we’ll come back and add a pony wall to get the remaining footage to go the entire height.
Once the walls were stood up and attached the last thing was to connect them all together up top with a double top plate.
We had started off with the easiest walls first but once we started working around the room, we divided up to conquer. I continued framing walls while David started removing old framing that would be in our way, while Jacob started getting clever with chain hoists to remove the few roll up doors we would be deleting.
Then this second bay door was just redundant. I’ll leave the right one for loading and unloading but since this will be a retail space, two just wasn’t needed.
To delete a giant space like this, we first framed it up so the wall would first snuggly in between the door opening. It can be attached with some self tapping screws all along the sides and top to go into the metal framing members. Blocking could be added in, then we could move to the outside to cover it up and blend it into the building.
To do that, we removed the metal trim from around the doorway first then just started installing the same metal panels to match the rest of the building. You can overlap each sheet by one corrugation and soon enough, it looks like there was never a door there. Don’t worry about the color because at the end, the entire building will get a coat of paint.
Last thing to really make the door gone is to remove the roll up door on the inside. It’s incredible how heavy this is, but no worries. Jacob made some custom boxes to hold two chain hoists up in the ceiling so that two people could lower the entire roll up at the same time. David monitored our progress to make sure we were going down an an even pace.
Another thing I wanted to change and delete was the placement of the front door. On the previous space, it was located on a side of the building that was around the corner from the parking area. Jacob deleted this space pretty quickly while I worked on throwing up more walls. After the door was out, we sheeted the outside to blend the space as well then finished installing all the needed inside walls.
The previous owners had this bump out that was used as an office space with a mini split in it. I decided to keep it and turn it into the shipping department where my mom could work out of instead of my dad’s garage where she has been working up to this point.
Since the ceiling on it is lower than the perimeter walls, we built some pony walls to first extend the height. While Jacob finished attaching things, David built up the corner so it would be on the same plane as the two walls, and I started pulling off trim from around this window.
Whew, what a lot of work. It took us two days to get to this point and while it looks good, we still had a ton to go.
I told you earlier that I changed my min on the type of insulation I went with. I decided to go with spray foam because of a few factors but mostly because it’s incredibly quick and efficient. A crew came in the day after we got done framing and starting laying down plastic to protect the floors, then they immediately started in on putting material in the walls and ceiling.
I’ve done spray foam before in my own shop so I’m already aware of how awesome it is, but it’s still fascinating to see it get sprayed in and balloon up then also how much ground a crew is able to cover in just a few hours.
After they were done, we moved back in place to continue working.
Since I had already bought the insulated batts, I went ahead and put in another layer of insulation in both walls where the most noise would be coming through. This partition wall which will separate the shop from the retail space, then also the other gable end which separates the major road from the retail space.
I’m not sure how much this will help, but it certainly can’t hurt and it also gave me something to stay busy with while Jacob got ahead and the next step which was painting the panels for the wall sheathing.
We left the plastic on the floor from spray foam and Jacob set up a spray area to start giving all the sheathing a coat of paint. For this, I really love the look of ship lap, but it’s not only expensive but it’s also slow to install as you have to do it one board length at a time. To make our job go quicker, we created feaux ship lap by laying down 1/2” plywood on the CNC and having it cut in grooves. Easy peasy. This will give the entire space the look of ship lap but drastically save on cost and time on install because we’ll be able to throw up huge sections at a time.
To start installing it, we used a laser level in the center of the room to establish a level line around the space, then started sticking them. Each board needed to be cut to land on the center of a stud, then most of these lower ones had an outlet or two that also needed to be cut around. Overall through, this step goes by quickly.
One thing that helps with speeding it up is to only tack the board into place. I would use a pre drill on the four corners then another drill to drive in the screws. Later, once everything is installed, we’ll go back and do the attaching in the center of the board.
Instead of waiting until every board was painted to start installing, we ended up changing our game plan. The thing that we really wanted to avoid is painting the upper walls on scaffolding and ladders later on, because that’s just not any fun. But painting the lower walls isn’t a big deal. With that, we used the unpainted panels for the first two layers around the walls, then switched over to the painted panels once we got to the upper walls. It created a kind of quilt work looking pattern, but pay no attention to it because it all comes out looking uniformed in the end.
To try and hide the screws as much as possible, we would place them in the grooves of the faux ship lap instead of on the face. Then, we also made sure to stagger the seams of the panels. If I’m not mistaken…it only took us a day to get all this main panelling up! So it really does go quick once you get into a groove. Also…what a drastic change it makes to the entire space.
Terry and I started working on sheathing the shipping department while Jacob started doing the pony wall framing for the gable ends. He cut a bunch of short studs to length then installing them and a top cap.
This will give us the bones needed to run sheathing all the way up on both sides. Working with these heights, it’s far easier if you have somebody staying on the scaffolding then another person doing the ground work or cut work and passing up what’s needed.
It is so cool throwing these pieces in, it all just works like a puzzle. You not only have the slope to cut and get correct but also making sure the groove patten stays the same is kinda of tricky, especially once you get to the end and start trying to utilize large cut off pieces.
It was verrrry exciting getting to the end. I was actually happy to call it a day right there, but Jacob was motivated to stay a bit longer than normal in order to see the space painted as one color. So that’s what we did.
I worked ahead of him and taped off doors and windows, and made sure he had plastic down on the next area he would be moving to, and he painted.
Looking back on it, I think using the painted panels at the top was kind of a pain but I still think it’s easier than somebody having to paint it from a ladder.
: ) What a change!
You guys….this is a ton of work. It’s exhausting but so exhilarating. 100% changing a space like this in just a span of a few days is crazy to me. Adding walls, deleting doorways, and creating an atmosphere that’s a compete 180 from what it was before….it’s just an amazing feeling. You know another thing, I love that I film my projects because it’s so easy a few weeks or even months later to get use to the way it looks and forget the details. I love being able to look back at the process and get a sense of pride all over again.
Stay tuned for the next steps to take this space even a bit further though. I have an idea for the wall decor that I’m dying to execute and show you. That will be coming up shortly.
For an even better tutorial, be sure and watch the video.
Thank you all for the support and if you’re ever in the Hill Country of Texas, be sure to stop in and see this space for yourself!
If you haven’t already, don’t forget to sign up at the top of this page for my newsletter so you don’t miss new projects!