In my shop this week it was all about doing a little bit more organizing. I’m sure you know it’s easy to set a pile on the floor and let it continue to live there. So I find that by forcing myself to look at it and think “what do I want to do with this”…little bit by little bit I’m slowing breaking in my shop and making things easier to find.
Things I Used in This Project:
- ISOtunes Bluetooth Hearing Protection: http://amzn.to/2pEjNtv
- Infinity Table Saw Blade: http://bit.ly/2HUCRsF
- Table Saw Insert Plate: http://bit.ly/2CIxrmA
- Dado Stack: http://amzn.to/2AVJ0F4
- Miter Saw Stand: http://bit.ly/2pwceVy
- Miter Saw: http://amzn.to/2tF5Azc
- Triton Belt Sander: http://amzn.to/2AMO3VP
- Woodpeckers 12″ square: https://amzn.to/2F43pvp
- Triton SuperJaws: http://amzn.to/2zYTWSv
- Ultimiate Workbench Plans: http://bit.ly/2LdT3Z0
- Titebond Original Wood Glue: http://amzn.to/2hMkdZw
- Awesome Velcro: https://amzn.to/2QyOISs
- 4’x8′ SafeRacks: http://bit.ly/2AYLvGv
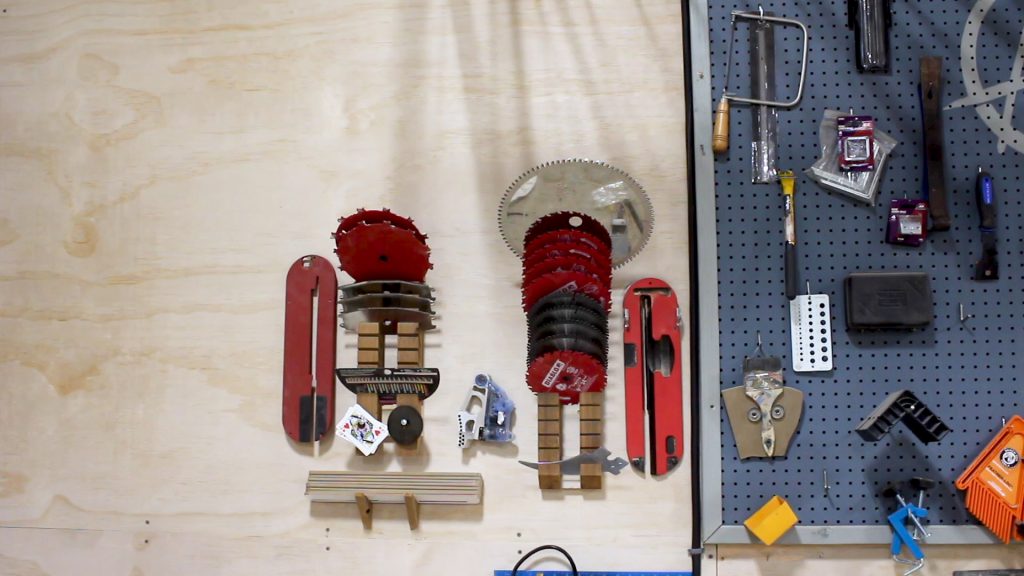
Let’s start off with a storage solution for extra saw blades and all those accessories. Between my track saw, circular saw, miter saw, table saw… and then I also have my dado stack, insert plates and all of the interchangeable inserts. I’ve had a big pile sitting on the floor next to my table for a while.

As I often do with shop project, I looked through my scrap wood and found chuck of cedar that will work well for this project. I started off by marking down one edge every 1”. Then I set my table saw to 45 degrees and made the cuts line up to my marks.


After working down the entire length of board I set my saw back to 90 and ripped it right down the middle.
 I placed a French cleat on the back as well as on the wall then started loading it down with my blades. Starting off with my larger diameter blades at the top. I made an identical one for my dado stack.


For my insert plates I cut two triangles at the bandsaw, drilled a pocket hole into each, then attached them to the wall to create a shelf I could set the inserts on.
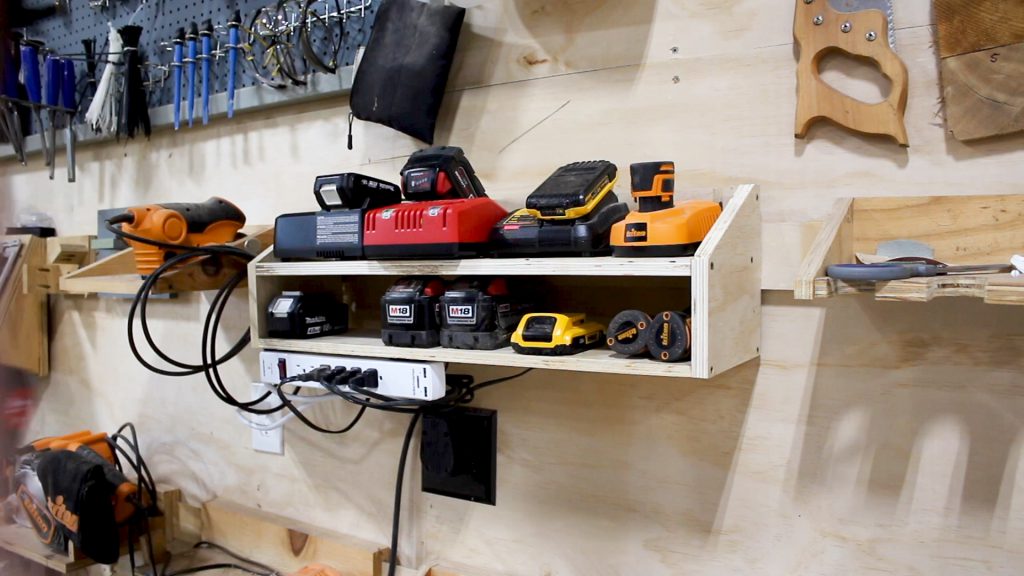
Next I started working on a battery charing station. I have one charger from each manufacture so I wanted a simple shelf that could keep them all together and organized for me. I again reached for some scrap, this time going with 3/4” plywood. I measured the chargers I have to store then cut a bottom and a back to create a shelf.

Before joining things together I laid the chargers out on the shelf and marked off where the power cords of each, fell on the shelf. Then I cut this location out over at the bandsaw. This will give me a place to route the cords later on.

I stuck things together with Titebond Original wood glue, using my Super Jaws to help hold things down, while I pre drilled and used screws to attach the two pieces.

Next I cut some wings that will not only give the shelf some support but also act as the sides of the lower shelf that will hold the extra batteries. To make getting the shape of this side wing easy, just set your shelf on end and trace the profile. I made my lower shelf 4” but measure your tallest battery and see if you need yours to be taller. After getting it cut at the bandsaw, I once again used glue and screws to attach things.

Now I just measured in between the two side wings and cut a shelf to fit between. I added in a few French cleats on the back then set it in place and loaded it down with power tool batteries and their chargers.

I did add a power strip, and this is so I can plug all my chargers into the strip then plug the strip into the wall.

Alright then the last thing I decided to do was installed some ceiling mounted, steel storage racks made by a company called SafeRacks.
 I have installed this racks in my garage before so I already knew how quick they were to install and just how handy they are at getting those larger items that I need to store, off the floor and away from the valuable lower wall space, and up higher where they are still assessable when I need them.
I started off by placing the ceiling brackets into the joists.

After getting these attached I went back down to my workbench and started assembling the vertical arms. This is where you can adjust the height of the entire unit. To determine the height of mine off of the ceiling, I measured the totes I would be storing and decided that 3’ would be plenty.

After getting all four set to the same length, I hopped back up on my scaffolding, very quickly attached them, and then started putting in the cross members that make up the body of the shelf.

These SafeRacks do come in a variety of different sizes but I went with the 4’ x 8’ model, and airing on the side of cation once again of leaving myself extra room for extra inventory, I installed two of them. I’m not sure what the weight capacity is for the smaller racks but these 4×8’s are rated at 600 lbs. So that’s quite a bit of stuff these can hold!


I actually built another storage solution for the shop and that is this finishing rack which holds all my paint/stain/tube of caulking/and glue bottles. This was a few weeks ago when Triton Tools and Matt Cremona came to visit and Triton actually captured the project and produced a full video with a lot of fun behind the scenes included. Click here to check that out.


Be sure and watch my full video at the top for a more detailed tutorial of these projects. I hope yall enjoyed this one and I hope ya’ll go out there and clean those shops! See you on the next build.
The post 4 Shop Organizing Projects appeared first on Wilker Do's.
from Wilker Do's https://ift.tt/2Fl7iwp


No comments:
Post a Comment