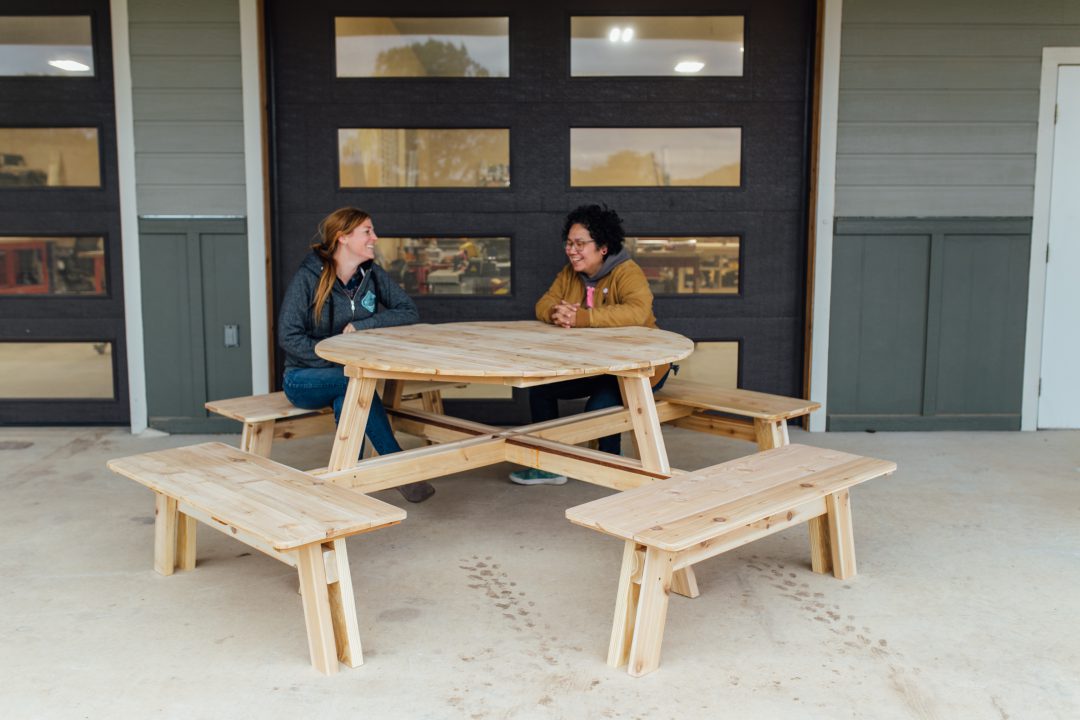
It’s finally cooling down here in Texas to temps that are nice to sit and or eat outside. So this week I made this picnic table which sits 8 people and has a hole in the center for optional shade.

Let me show you how I did it.
Things I Used in This Project:
ISOtunes Bluetooth Hearing Protection: http://amzn.to/2pEjNtv
Armor Mobile Workbench: http://bit.ly/2JL03ix
Armor Hold Down Clamps: http://bit.ly/2Xew2e0
Triton Circular Saw: http://amzn.to/2rk9hWO
Triton Jigsaw: https://amzn.to/2MAs929
Miter Saw http://amzn.to/2tF5Azc
Miter Saw Stand http://bit.ly/2pwceVy
Titebond III http://amzn.to/2zZIRQw
Plywood Workbench: http://bit.ly/2LdT3Z0
Armor Pocket Hole Jig: http://bit.ly/31TeZRi
Bessey Quick Clamps: https://amzn.to/2YZ0Dxk
Triton Large ROS: http://amzn.to/2qnD8R1
Triton Router: http://amzn.to/2zRSdvF
Infinity Round Over Bit: http://bit.ly/2LAsD35
Since this will be outside year round, I made everything from cedar. Cedar is not only naturally rot resistant but it’s also extremely light weight. So even though this unit is large, two people can easily pick it up to move it.
I started by off loading all my material onto my mobile Armor Tool workbench then moving it inside to start cutting things up.

Let’s start by making the base of the table, which is made up of four 2x4s with half laps in the center to join them. To make this quick and easy, I started by taping together all four of the 2x4s, making sure the ends were flush before doing so.

Next, I pulled measurements on where the half laps needed to be placed, and used a speed square to transfer the line to all four at the same time.

I’ll be using a circular saw to cut these out, so next I set the depth of my blade, locked it into position, then made several cuts inside my lines. One feature I love about this Triton saw is the optional laser guide, it makes making straight cuts much easier.


After making several cuts, I used a chisel to pry it over and break the pieces loose then cleared them away. Man, that sound is so satisfying.

While working on these base pieces, next I cut in the notches that will later rest on top of the benches. The important thing here is that not all four are identical, two are on the same side as the half lap direction, but the other two are opposite. So after untaping the bundle of four, I retaped them into pairs, making sure to flip one of the bundles.

Then I again made my marks and used my saw to cut out the notch.


Alright, before moving forward I stopped to test fit all four pieces together and make sure things lined up and was going to work. Perfect, lets move on.


I wanted to add a slight curved surface to the ends of these pieces because they are slightly seen from under the benches. However, you could just leave them at a 90 if the look doesn’t bother you. You’ll see more clearly what I mean at the end. I used some flexible table to roughly draw a curved line then a jigsaw to cut it out.


After getting one done, I used it as a template for the remaining boards.

Ok, now to make legs for the base.
I flipped out the wings on my miter saw stand, angled the deck, and cut a few boards with my Miter Saw.

I attached the first one by laying both flat on a workbench then driving in some screws.

However, it’s really important that the first leg is on the exact same plane as the first….even 1/2”, 1/4”….will make a noticeable difference. So what I did was cut a scrap to the height of this beam so that I could stand it up and have that first leg flat on my workbench.

This way I could take the loose leg to the other side, and attach it while making sure it was flat against the workbench as well.

Same concern came into play when building out the second leg assembly, the legs all need to be placed in the exact place. My cheat to ensure this was to take my two remaining legs and place them against one of the attached legs and transfer the height to both.

Now, after attaching them in the same manner, I have two units that should be identical to each other and I could start joining them to each other.

With it being an outdoor project I’m using Titebond III on all joints and connections, since it is a waterproof wood glue. I applied glue to the bottom the half laps as well as all the side walls then started sticking things in their place.

I know it’s just 2x4s but I think this base portion does look extremely cool.

Let’s move quickly before that glue starts setting up. I grabbed a few Bessey clamps to throw on the center and apply pressure to the joints.

With that setting up, I moved to the outside to attach the second 2×4 to the 2×4 with the leg attached to it. The important thing to watch for here is to make sure they are on the same line as each other. You can see I used a level to span across both then stuck it in place with a few screws when they line up. I also threw a little bit of Titebond III behind this board before securing it. It’s crazy how much of a difference wood glue gives the final stability of a project.


Alright, the base is done, lets start building a way to attach a table top to it. I did this by cutting up a few 2x4s then using my Armor Tool Pocket Hole Jig to drill a few pocket holes and attach it all together.

This support structure will not only hold the top to the base, but it will also hold all the slats making up the top, together.

After I got all the limbs attached, I stuck it on top of the base, centered it up, then attached it using two screws per leg. I skipped the wood glue on this step incase I ever want to replace the top.


A quick stand on it test….. That feels good so far!

Lets make a top! Now I went with a round top because I don’t like how on a rectangle table, people get secluded if there are more than four people. A round top on this table will allow up to eight to all be included.
I started making the top by first cutting multiple boards to the same length at the miter saw, then laying them on top of the base. The intention is to attach them all while still square then cut it into a circle shape afterwards.

I found the center board and used a tape to get it centered on the base under it. Then I could use this one to position the rest to be inline with it. And this doesn’t have to be perfect as all the outside ones will be getting cut off, it’s the most centered slats that need to really be aligned.

Next, I used a framing square to transfer a line on the top surface to be in line with the frame underneath. This will give me a visual reference on where to start throwing in screws. You have a wide 2×4 to hit but things do look nicer in the end if you keep your screws in a straight line.


This is another step where I skipped using wood glue, just in case I ever need to change out individual slats in the future.
Once all the slats were attached, I drove a screw in the very center of the table, then found a string in my shop that was at least a few feet long to attach to the screw.

Now I could pull the string tight while holding a pencil at the very end, and mark the table slats while walking around.

Once I checked it over and made sure it looked good, I used a jigsaw to cut it out.

I couldn’t help but give it another standing on test. You know, new surface and all…

Ok things are still looking good, except for three slats on each side (if a circle has sides) weren’t able to attach to the structure underneath and this left them wobbly. No problem though, that is an easy fix. I cut a few 2x4s to span diagonally between two of the vertical arms. This will keep things hidden but span across all of the slats that need attaching in a second place. I used a few more pocket holes to quickly add these in.


Moving back up to the top, I could now drive in a few screws to secure these ends and that made a world of a difference. So moving on to the details of the top, starting with sanding.
I’m using my large ROS sander with a heavy grit paper to go around the edges and clean up not only the shape of the overall circle but also all that end grain.

Then to soften the look and the feel a tad bit, I stuck an Infinity Round Over Bit in my Router and went over the top surface as well as the bottom surface.


Base is done, table top is done, lets make some seating.
So the benches have four legs each and again the main concern is getting them all on the same level with each other, the other benches legs, and also the four legs from the table base. To make this easier, I made a jig. which is just a straight board that I clamped to the edge of my plywood workbench.

It’s simple, but what this allowed me to do is place both legs flush against this board while attaching the stretcher to connect them. I’m using wood glue as well as two screws per joint here.

When it’s time to attach the second pair of legs, it is too tall to use the jig, however if you can use a scrap with a 90 degree cut on the bottom to reference from the bottom leg up to the top leg and make sure they are in line. Then on these two screws, I made sure to make them opposite of the ones below it, just to avoid hitting each other.


I wanted to make sure all of this worked before I moved on, so I took this seat base and attached it to the table base. I did this by just kind of flipping it into place. I made a mark on center so I could line it up correctly from left to right. Then attached it by toe nailing in a few screws.

For a seat bench, I kept it pretty simple. I went with 1x6s here to give it a slightly different look than the table top and used a few scraps to attach them together.

To soften the look I used my glue bottle bottom to trace on a curve into each corner then a jigsaw to cut it out.


I also rounded over both the top and bottom edges before I centered it onto the seat base and attached it using screws.

It’s worth noting that since building mine and actually getting to sit on it, I made a few modifications. I reduced the seat to only two slats wide, and also drew in the placement of the benches so that seats will come out a few inches closer to the table. So if you are interested in buying a set of plans to build your own, know that they are refined and have everything you need.

After I made sure the seat was going to work, I repeated the process to make the remaining three. With it done, of course I had to do another stand on it test and I must say, I was really pleased with how sturdy it is.

And there we are, two days to build this, which isn’t bad I don’t think.
It will hold eight people total and what I like about this design over a traditional table is people can slip right around to their seats instead of stepping over something. This design also prevents people from getting stuck the center and hitting people while trying to get in and out of their seat.

I will apply a cedar color stain to the table but I just love love love the beauty of raw cedar so I wanted to leave it bare for photos.


If you’re looking to build a picnic table don’t forget I have a video showing how to make a rectangle table, but with removable benches. I have plans to both designs HERE if you are interested.
Don’t forget to check out the video above for more details.
I hope you enjoyed it and I’ll see you on whatever I’m building next.
If you haven’t already, don’t forget to sign up at the top of this page for my newsletters so you don’t miss new projects!
The post How To Build A Round Picnic Table with Benches appeared first on Wilker Do's.
from Wilker Do's https://ift.tt/2BgDfB6

No comments:
Post a Comment