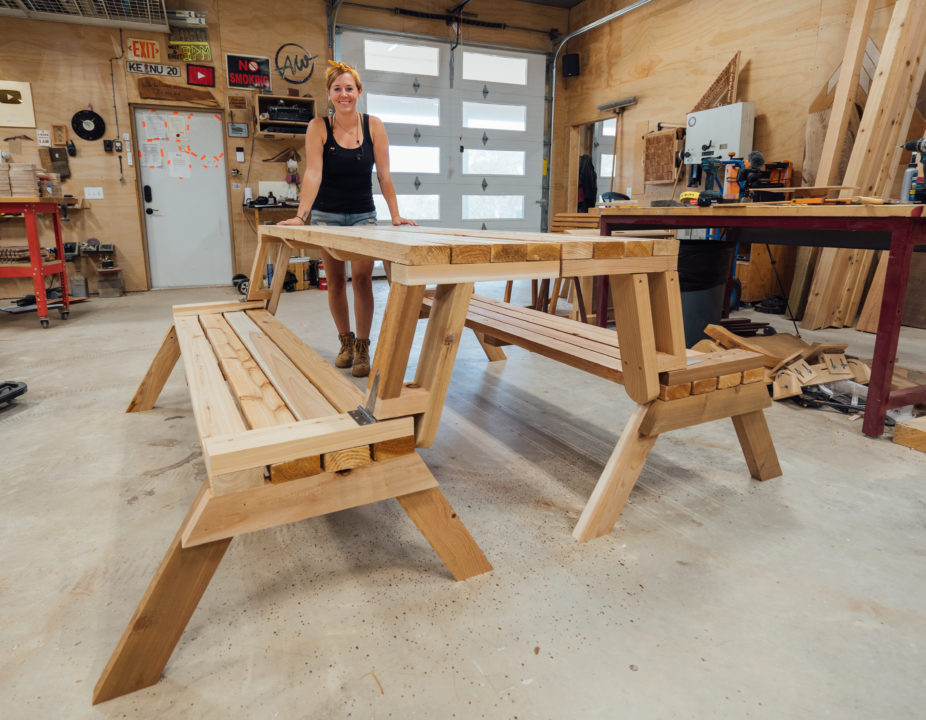
Hey watch this….is it a bench, or….is it a table?….or is it a picnic table? I saw one of these convertible benches and just had to make one. I love the concept of having two seating options that can quickly turn into a table. It’s perfect for outdoor spaces like porches. Let me show you how to make this one.

Things I Used in This Project:
- ISOtunes Ear Protection: http://bit.ly/2YuZBtr and https://bit.ly/2Cf6OXP
- Armor Workbench: http://bit.ly/2JL03ix
- Triton Thickness Planer: https://bit.ly/2PJQn9a
- Miter Saw Stand: http://bit.ly/2XKAo0J
- Clamps: https://amzn.to/2YZ0Dxk
- Triton SuperJaws: http://amzn.to/2qFLYJF
- Armor Pocket Hole Jig: http://bit.ly/31TeZRi
I have plans for this project here: https://bit.ly/3h2LZOi
For this project I’m actually using the left over cedar 2x4s I have on hand from building a fence. So I started by off loading them onto my Armor Tools mobile workbench to get them ready for building.

Personally, when I work with cedar, I always run the boards through my thickness planer first to remove the roughness and save on sanding time later on.

Then I moved all my boards over to the miter saw to start cutting up into the needed pieces. If you’re interested in a full cut list and material for this project, I have plans linked for you down below. Since I was going off my cut list within my plans, I was able to process all my boards at the same time.
Just a tip for you, I always move my workbench in line with my miter saw stand so I can pull material directly off and into position.

Ok lets start assembling! This bench will be for kiddos so it’s lower to the ground, but know that you can very easily raise it up higher for adults. I grabbed what will be the two legs and the stretcher that connects them and started putting them together. You can see I used a scrap near the bottom to make setting the legs in place, easier.

I applied some outdoor wood glue then once the top was flush all the way across, I used a countersink first then drove in two screws per leg. After attaching the first, I repeated on the second. Then I made another assembly identical to it for the other side. If you’re making both benches at the same time, then you would make four total.
I set those aside and got started on making the bench seat. For this I laid out four 2x4s on my workbench and lined up the ends flush to each other. I first found center of the bottom board then started attaching a center support member. Again using a counter sink first then driving in screws.

After attaching it to the bottom board, I moved to the top board and repeated. Note, use a speed square to ensure you’re attaching this board on at a 90. Now that I had the top and bottom attached, I cut a spacer to make spacing out the remaining boards equal. Then I went back to the center and attached the center support to these middle two boards as well.

Now lets attach the two! The ends won’t want to stand up on their own so I grabbed some clamps to increase their footprint and this worked like a champ. At least well enough for me to grab the bottom and set it into place.


Next was to attached them together. I first applied wood glue then used screws in all the boards to go into the leg assembly. Note: I recommend using a square to ensure the leg is not only square to the bench’s seat but also vertically from the ground.

After checking both planes, I drove in the screws on both sides. Again using my spacer to make sure everything was nice and even.
Alrighty, now lets add the left and right supports that will join the bottom’s boards together and stiffen up the seat.

Easy enough, moving on to making the top!
This is almost the same as the seat except it has more supports in the center of it. So I first laid out my marks according to my build plans then set my boards in place. Once I confirmed that it all looked equal I attached them in place.

Ok almost done. Now on to the arm assembly.
I first cut the two pieces that make up the bottom and the front of the arm then used my Triton Superjaws to join them together. It’s worth noting that I first only used wood glue and screws here but later came back and added some dowels to reinforce the joint some.

Once that was put together, I added a strap hinge. This is the part that will allow the bench to convert into the table by folding up.
After getting it attached to the bottom of the assembly I moved to the top and added on what will be the back. This is also the part that will allow me to attach this entire unit to the back itself. I set it in place, then used a clamp to secure everything down while I drove in screws.

Lets set this in place now and figure out where it needs to be set in order to fold forward and work properly….

There isn’t an easy way to set it in place to mark the needed screw locations without it moving. So I ended up cutting a scrap to length so that I could flip the top forward and it hold it in place for me.

This worked beautifully. Once it was forward I was able to use a countersink and screws to attach the hinge in the needed location.

It isn’t completely done yet but lets try it out! Ha, that’s pretty neat huh?

Ok, last part that’s needed is the arm! Simple enough. I grabbed a roll of tape off my workbench and used it’s curve to trace a round shape on my 2×4 then cut it out over at the bandsaw.

Now this arm can be attached to the entire assembly.
If you build this, definitely follow my plan instructions and not what I did here. Remember that I’m building things for the first time when I make videos. So as I build, if I see something that can be refined, I make the change in my plans for the people who want to replicate the project.
So anyways, it would be much better to attach the arm in place before the entire arm assembly gets attached but I made it work by using my Armor Tool pocket hole jig and connecting it that way from underneath.

Ok lets see how that works. So it’s a bench that can be tucked on a porch but then easily converted into an eating station in just a few seconds. Then if you go through all the steps to build an identical second, they can be move together and turned into a larger seating area that could go back to two benches after all the festivities are done.


I personally don’t think these will get moved together very often, but the fact it’s another option is pretty cool. Remember if you want to build your own then I have a set of plans over on my website to download. Also if you’re interested in outdoor furniture then check out my Plans section here on my website where I have plans and templates for tons of other projects such as a Folding Adirondack Chair, Rocking Chair, and Porch Swing!
Dont forget to check out my plans for this build here: https://bit.ly/3h2LZOi
I really hope you’ve enjoyed this video! I’ll see you on whatever I’m building next.
The post DIY Folding Bench | Turns Into A Table appeared first on Wilker Do's.
from Wilker Do's https://ift.tt/3iQptso


No comments:
Post a Comment